Showing posts with label techy coach. Show all posts

Sep 9, 2016

Go Google for the New School Year

Have you been dabbling in Google Tools for a while?  Is your school Google-Ready, but you just haven't gotten your feet wet?  Maybe you've played in Google Drive, but you just aren't sure what to do with the other tools?


Its time to get started!  Get off the fence and jump in head first with a Google Course from the Techy Coach.
Pick the course that fits your needs:


Let Google Drive Take the Wheel


Audience?  Newbies and Google Strugglers
What's Covered?  Still shackled to the big box suite of software on your PC? Want to learn the first steps to creating a paperless classroom? Unplug and go mobile with Google Drive. This course will help you become more productive while learning how to:


  • Upload and Store Files in the Cloud.
  • Manage your files and access them from anywhere.
  • Collaborate with others in real-time.
  • Create and share documents with others.

Jul 6, 2016

New Course from the Techy Coach - The Google Forms Guidebook

Be the first to enroll in 
The Google Forms Guidebook
A new online course from the Techy Coach!

This course will walk you through how Google Forms works, from start to finish. 
  • Learn the basics of what Google Forms can do.
  • Uncover advanced features you didn't know about.
  • Discover ways to use forms that stretch beyond basic polling.
You'll be making polls, surveys, assessments, and learning activities in no time!  This course includes new tutorial videos and course materials, as well as links to a few of my tried and true, tips and tricks related to Google Forms!
Enroll by July 31st, and use the promo code HALFOFF to receive $10 Off the enrollment price.

Jul 2, 2016

Be the First to Test Drive the Techy Coach Online

It's time!
Learn One on One from the Techy Coach!

Here at the Techy Coach, I've been working to develop a series of online courses for you!  Now, it's time to get started.  The first course in a series on Google Apps for Education is ready to start, and I wanted to give you inside access first!


Course #1:   "Let Google Drive Take the Wheel"

Learn the basics of Google Drive, as well as some inside tips and tricks to make you more productive!

As a Techy Coach subscriber, you'll be able to access this course before anyone else.  Plus, everyone who enrolls will receive a free copy of the Google Drive Cheat Sheet!
Ready to get started?  Use this link - http://learn.techycoach.com 

Be one of the first 10 to enroll and receive a discount.  Use the coupon code HALFOFF
More courses are in production now, and you'll have the future option of enrolling in the series at a reduced rate, so stay tuned!

Interested in something specific?  Tell me what you'd like to learn here -

Techy Coach Course Requests

Jun 21, 2016

Take A Course with the Techy Coach

Very soon, the Techy Coach Blog will begin offering online courses.  In preparation for that day, I am polling you - the reader - to see what types of training you would like to see on the Techy Coach Blog.  So to that end, please fill in the form below and voice your thoughts.

Thanks!


May 4, 2016

Havin' Fun with Conditional Formatting: Google Sheets & Punnett Squares

Sometimes in Science classes, the best way to get the point across to a student is by using an interactive activity.  There are many out there that exist, but how would you like to have your own that you create and that you can modify as needed?  

As a Biology teacher, I was always searching for interactive content to teach Punnett Squares and Mendelian Genetics.  In doing so this week for our Science Teachers, I put together an activity that yielded this video.  It utilizes Conditional Formatting in Google Sheets to add a bit of interactivity to help students understand the connection between Genotype and Phenotype.  


For the non-Science teacher, hopefully this video gives you some insight into how Conditional Formatting can be used in different ways.

For the Science teachers out there, if you'd like a copy of the activity, use this link.  

Apr 26, 2016

Get Classified - Create a Dichotomous Key with Google Forms

If you are a life science teacher, then surely at one time, you have taught the concept of Classification Systems and Dichotomous Keys.  A Dichotomous Key is a tool that can be used to identify a living thing or object based on physical characteristics.  


In thinking on this topic, while preparing for a GAFE Workshop for Science Teachers, I thought I'd put together a Tutorial Video that explains how to make a Key using Google Forms.  The great thing about Forms is that there is an option for Multiple Choice questions call "Go to Section Based on Answer".  By using this feature, you can direct the user to the next question by using their response to the question.  Perfect for a Dichotomous Key.


For more information watch this video tutorial.


Apr 22, 2016

Google Cardboard Plastic

Have you seen Google Cardboard Plastic?  Its the most advanced virtual reality you'll ever encounter!  Watch this video to see:


Couldn't help but post that.  But seriously, I love that Google has a sense of humor.  

If you haven't checked out Google Cardboard and the mobile apps available, you have to try them.  This list is a rundown of Cardboard viewers and apps you can use, along with links to lesson ideas I have found on the web.  Enjoy!

Google Cardboard Viewers


Google Cardboard Apps

Google + Community - Cardboard for Education

Lesson Ideas

Tell us how you use Google Cardboard?  Share your experiences.  View Responses after the form.


Apr 9, 2016

Boost the Power of Comments When Grading Google Docs

The greatest thing about Google Apps for Education is that teachers can go paperless.  By making lessons available on Google Classroom, or affording students the flexibility of submitting work via Google Docs, there is little to no need for paper submitted work.  And, it also takes away the argument of "my dog ate my homework".  Unless your dog eats the internet, I think that excuse is gone.

The only thing greater than going paperless, is the ability to leave comments when grading student work. If you haven't already noticed by now, there is a Comments button at the top right of any Google Sheet or Doc.


Teachers can also change from Editing to Suggesting in a Google Doc.  Suggesting allows any edits typed on the page to become suggestions that students can use later to update a Draft before turning in a Final Submission.


But when it comes to grading digital submissions, one of the complaints I hear from teachers is that they tire of typing the same comments over and over again.  There is a way to combat this task, if you feel the same way.

In Docs and Slides, users can use the Preferences in the Tools menu to set up frequently used phrases.  


For instance, if you wanted to leave a comment such as "hyphenate this word", but you don't want to type it over and over again, you could use the substitution "hyp" to auto insert the phrase.  

  1. Just go to Tools, and click on Preferences
  2. In the Replace / With boxes, type your shorthand preference in Replace and the long version of your comment in the With box.
  3. Click OK

Now you're ready to use your substitution.  In Suggesting Mode, just click where you want to make a suggestion, type your shorthand comment, and click enter.


Happy Grading!


Apr 3, 2016

How to Protect Information in a Google Sheet

Sometimes in Google Sheets, it is necessary to protect a range of cells, or even an entire sheet so that other users cannot edit them.  Likewise, you may have multiple users in the same sheet, and you may have the need to set permissions for cells that allow only certain users to edit.  An example may be a Sheet you are using for Collaboration, in which you want each student to have access to only one row.  Another example is when a Sheet is being used as a fillable form rather than using a Google Form, and you wish to protect headers, questions, and other data from end users, while still allowing them to enter information in empty cells.

To protect cells in a sheet:


  1. Highlight the Range of cells you wish protect
  2. Click on the Data Menu
  3. Select Protected Sheets and Ranges
  4. A menu will appear at the right of your sheet.
  5. Click Set Permissions
  6. Change "Only You" to Custom and enter the account of the user you'd like to restrict to these cells.


To protect an entire sheet:
  1. Click on the dropdown menu in the Tab of the Sheet you want to protect.
  2. Choose Protect Sheet
  3. A menu will appear at the right of your sheet.
  4. Click Set Permissions
  5. Change "Only You" to Custom and enter the account of the user you'd like to restrict to this sheet.

Both of these functions come in very handy.  There have been several times when I have used a Google Sheet as a group activity in which I wanted students to answer questions that we could all view and discuss as they were being answered.  But because some students like to "mess" with other's cells, it was necessary to protect that information and allow only the user of that row or cell access.  

Hope this helps!

Apr 2, 2016

Share Links More Quickly in Google Drive

Sometimes as a tech-geek, I feel that technology providers change tools to the point that I feel spoiled.  But if there is a quicker way to do things, the lazy man inside me wants to find it.  Here's one for you.

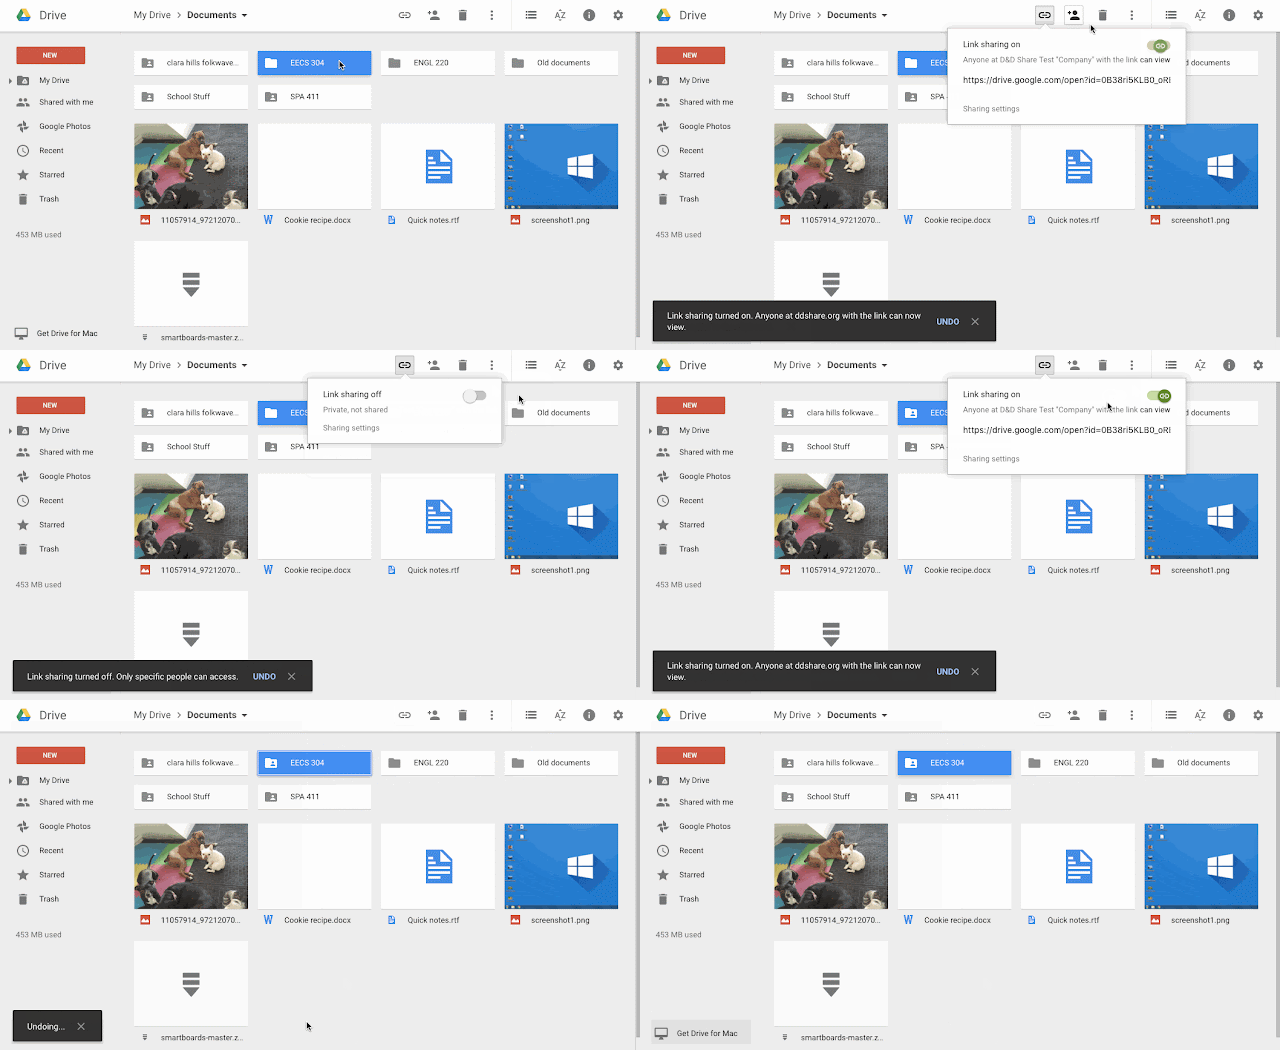
This week, Google released an update to Drive allowing faster link sharing.  Now, simply by selecting your folder or file, you can click the Link icon at the top of Drive, and get a link without the need to open the document and then open sharing settings.


The popup box allows you to turn on link sharing to "Can View" and copy the link  so you can share documents quickly.  


Conversely, you can also quickly turn Link Sharing off if it is already on and you need to make that change.


Mar 25, 2016

Create Pixel Art with Google Sheets

Several articles  over the last few years have been posted on the web about creating Pixel Art on Google Sheets.  To give everyone out there a visual explanation, I've created this tutorial on how to create your own Template.  Enjoy and feel free to download the template below the tutorial to try your hand at pixel art.


Mar 3, 2016

Google Apps Updates - Google Sheets and Templates for Docs

This week, Google dropped two updates that are sure to whet your appetite.  Take a look at these changes!

Google Sheets

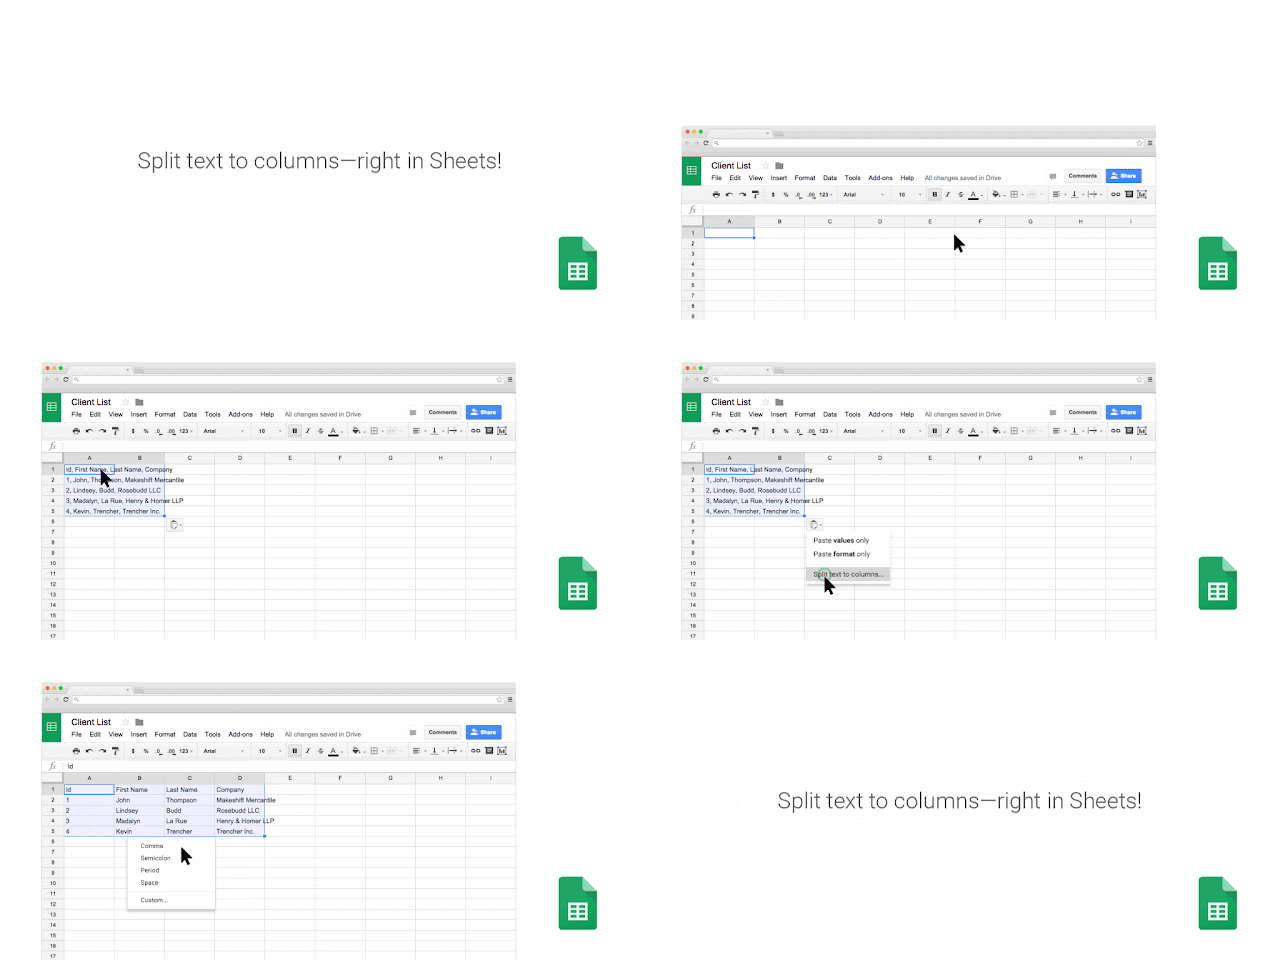
For all of you spreadsheet lovers who have been waiting for a text-to-column tool, its here!  On March 1st, Google added a Text-To-Column option allowing you to split text into separate columns.  Here is a sample along with the post from Google


Templates for Google Docs

Also, today, Google released new templates available for Docs, Sheets, and Slides users.  These templates have been created by pros like Quickbooks, Google Science Fair, and Reading Rainbow.  To use Templates, all you have to do is click on the File menu of any doc, choose New and Template.


You can also access the templates by visiting the main links for each doc:


Feb 29, 2016

Create Appointment Slots to Book Parent Conferences or Check Out Equipment

Recently a question to the Techy Coach was posted regarding the ability to reserve Chromebook Carts. A teacher is asking if there is a good way to use a Google Form to reserve carts, and also populate a calendar event automatically.

There are a few ways to do this, but if you are a Google Apps for Education (GAFE) User, the best way is through the use of Google Calendar Appointment Slots.   Appointment Slots are an option available to GAFE Users on Google Calendar, that allow you the benefit of assigning slots in your calendar that users can click on to reserve almost anything you choose.  One of the best uses besides checking out equipment is as a means of booking Parent Conferences.  Watch this video or view the steps below to get started:


Create an Appointment Slot
  1. Open http://calendar.google.com
  2. Login and click anywhere on your calendar to create an appointment.
  3. Click Appointment Slots at the  top of the box.
  4. Enter a name for the "what" portion of the event, such as "Chromebook Reservation"
  5. Be sure to choose the correct Calendar that you want your appointment slots to appear in. If you have not already done so, it might be a good idea to create a secondary calendar other than  your personal calendar for Appointment Slots.  To create a secondary Calendar, watch this video.
  6. Click Edit Details.  A full screen editor will open.
  7. Edit the details of your appointment slots, including time blocks, and how often the slots will repeat on the calendar.
  8. Copy the Link to your Appointment Slots and share with your colleagues.
  9. Save your event.

This is how appointment slots appear for 1 hour blocks that repeat every day, Monday Through Friday:


When users click on a slot, a reservation in their name appears that they can save.  The slot will appear on both their calendar, and your calendar.  No one will be able to sign up for the same slot, meaning that slot has been reserved.


Share Your Calendar

After you create your Appointment Slots, you can share your calendar with your colleagues so they can see when slots are available or when they have been reserved.  To share a calendar with someone:

  1. Select the calendar you would like to share.
  2. Click the dropdown menu to the right of the calendar.
  3. Choose Calendar Settings.
  4. Three Options for Sharing:
    1. Calendar Address - Next to Calendar Address, click the HTML Button and copy the link provided.  Then share by email with your colleagues.
    2. Embed This Calendar - If you are comfortable with HTML Code, you can use the Embed option to setup your calendar and then use the Embed Code to place it on a webpage.
    3. Insert in a Google Site - If you have a Google Site, you can also edit any page on your site, click Insert and Choose Calendar to place your calendar on your sitepage.
Tip:  If you are sharing your calendar with those outside your organization, you may need to change your public sharing options.  

You can also watch this video that explains how to Share a Calendar:


Feb 25, 2016

Google Sheets: Import Data from One Google Sheet to Another

This week, a question for the Techy Coach came through about Google Sheets.  The request asked how one could import data from one Google Sheet to another.  

The first question many people may have, is why would you do this?  There are several answers, but one could be that your original sheet may contain information that you don't want others to see (email addresses, phone numbers, etc...).  So by importing data over to another sheet, this allows other users to see only the important information they need to see.


In my circumstance, I use an evaluation sheet for training.  One of the questions asks what attendees find valuable about the training session.  I use the responses to this question as quotes that I sometimes post in informational flyers or advertisements for training sessions.  As a result, I like to keep a running list of just those quotes.  So by importing that column of data into another sheet, I can see only that information.  Plus, I can keep a shortcut to that Google Sheet on my desktop, or in my bookmarks on Google Chrome so I can easily get to it anytime I want.

If you're curious about how to do this, watch this tutorial.  


Jan 8, 2016

Getting Comfortable with Gmail - Preview Pane

If you are a new user to Gmail and you miss certain features of your old email client, it can be difficult.  But for the most part, Gmail has a feature for most everything, so you don't have to worry.  

One features many of our teachers miss is the Preview Pane.  If you miss this feature, you are in luck.  You will need to click on the Gear icon at the top right and choose Settings.  Once there, go to the LABS menu.  From here, you can choose the Preview Pane lab by clicking Enable.  Make sure to Save Changes.

Once you have enabled this lab, you will see that at the top right of Gmail you will now have a "Toggle Split Pane Mode" button, allowing you to have a Vertical or Horizontal Preview Pane for your Inbox.  


You can also configure your inbox to "Pre-Sort" incoming mail into Primary, Social, Promotions, Updates, or Forums so that you can keep a handle on the flood of mail coming in.  This allows you to keep everything in its place.  


Beyond this, if you still need tips on keeping your email  under check, you can also use Labels.  Rather than assigning email into folders, Gmail allows you to apply labels to your incoming mail so it can easily be found later.  But not just one label.  Whereas with other email clients, a message can only be filed away in one folder, you can apply up to 5000 labels to one email message.  So you no longer have to worry if you have an email that applies to multiple topics.  Watch this video to learn more.


Dec 31, 2015

Gmail Series Part V: Setting Up a Signature Line

If you've seen email coming through your inbox with a fancy signature line, and you were just a bit jealous, this video is for you.  Learn how to set up your signature line complete with formatting, links, and Social Media icons.  Happy New Year and Enjoy!


Dec 20, 2015

Have a Question for the Techy Coach?

Often, my posts come as a result of questions from teachers in my district.  If you have a question  you'd like to ask the Tech Coach, just us the Submit A Question link above, or enter your question below.  Your question may become a blog post on this page!  

Jun 26, 2013

Coaching for education transformation - #ISTE2013

This presentation was a panel discussion focusing on teachers as technology coaches. Technology coaches have been found to be the most effective form of professional development. The benefit of a coach is that they provide a safety net to teachers who need assistance in technology integration.

Elements of Effective Coaching:

- Building relationships with teachers. Knowing the tech is part of it, but building rapport is important.
- Making the discussion/tech relevant
- Reflection. Have teachers reflect on what was effective, successful. Coach reflect on training - what is successful
- Build trust. Teachers need to feel that they can rely on coaches.
- Observation. What are their behaviors? What could they be doing differently in the classroom.
- Teachers are looking for a peer, not a trainer or supervisor. Coaching is a two way street.
- Start with those who are comfortable working with a coach.

Elements of Ineffective Coaching:

- Do not enable a teacher. Some teachers want you to come in and teacher the kids how to use a piece of software. Coaching is not teaching the kids. Coaching is teaching the teacher and modeling so they can be empowered to teach.
- It's not about the tool. It is about the end result. What do you want to do?
- Leaving out the high flyers. If you leave out the ones you assume are tech-learned, you will create a wall in which they feel left out. Work with all levels.

How do the roles of coaches impact highly effective digital age teaching and learning?

Digital learning allows independence among student learners. Coaching teachers in digital learning means that teachers can differentiate in challenging situations. Teachers are looking for solutions. Technology for the sake of technology is not what we are saying, but embracing new skills to provide solutions will make teachers more effective.

As an example, when implementing iPads in a district, it was found that having peer coaches allowed teachers to use iPads more effectively than if they had minimal training or if just given iPads with no training.

Evaluating Coaching:

Developing a portfolio for teachers is a good way to show growth. Focus groups also allow teachers to discuss needs, ask questions, and work with coaches to evaluate new tech. Developing an evaluation tool so teachers can evaluate their own experiences can be helpful - during pre and post training.

The most effective coaches are those who still work in the classroom, or self nominate and go through training.

How does effective coaching transform education?

Coaches don't always play the role of expert. This puts you in a position where teachers will sit back and have you do all the work. This creates learned helplessness. The solution is to create inquiry. What would you do? How would we solve this? This way allows the teacher to own the solution. The goal is to help them learn the capacity to solve their own problems. Coaches model collaboration which allows teachers to pick up those skills shown or discussed. Coaches help to develop networks of learning (PLNs).

Also, coaches need to work closely with principals. How does coaching fit with school improvement plan? How does coaching fit with school goals? Have a meeting with each principal so that the coach receives the proper support and the principal is able to receive information about the good things that are coming from coaching.

The best way to use technology is through inquiry. Ask questions. By modeling what they should do with their kids, you help the teacher teach the kids about self directed learning and inquiry.

What are the challenges to creating and sustaining a coaching model?

Time- It's great if someone has the primary job of coach, but this is not always possible. Some coaches work on release time. Work with administrators to remove some of those time barriers. Sub time works, as well as an extra plan hour dedicated to coaching.

Training - There should be training up front and professional development to build coaching skills in order for them to be effective.

Staff culture - Developing a rapport or trust with teachers is important. It takes time and support from the administration to develop a culture which establishes an effective coaching relationship. Communication of the impact of coaching - portfolios, successes, etc - is important to developing culture as well.

Resources:
-For ipads and reading, check out - http://fusd1.org/iread
-ISTE has a special interest group for teachers - #SIGETC
-Backchannel for discussion - http://todaysmeet.com/ISTECoaches


- Posted using BlogPress from my iPad

Jun 25, 2013

Beyond the Apps: A Pedagogical Approach to the iPad #ISTE2013

This session was presented by Aaron Svoboda, secondary learning coach, Kearney Public Schools
@Mr_Svoboda

The presenter starts by saying that he is tired of attending workshops where the speaker just talked about neat apps or "hey there's an app for that!" discussions. He feels there needs to be more meaningful discussion on designing lessons with the iPad. He is big on Madeline Hunter and promotes the principle of pedagogical design and purpose driven learning.

Check out his site here: https://sites.google.com/site/svobodagct/beyond-the-apps

Why ipads?
-In terms of a modes of delivery, he uses Wikispaces or google sites.
-Kids want to use the iPad, so it automatically engages them.
-The iPad provides a contained learning environment - everything is right in front of you.

Tools he uses:
-Quizlet
-Youtube
-Safari montage
-Socrative
-Mentimeter

Anticipatory Set
When working with kids, he starts with an anticipatory set. Question them and give them an activity or discussion topic to start with. It can be a quiz or a sharing of ideas using one of the tools above.

Objectives and Purpose
Then he moves on to the objective and purpose. Not necessarily what you're doing as much as why. He uses Google Forms to get feedback from students on their level of understanding on an objective. Allows them to interact with the objective.

Instructional input
Ways material can be delivered:
-Slide Decks
-Video
-Text
-Field trips
-Slide Share
-Google presentations
-YouTube
-Google docs video
-Websites

Tips for instruction:
Chunk instruction. Break up topics with activities; provide opportunities for understanding.

Modeling
Demonstrate understanding to your kids. In terms of the iPad, the teacher should be using the iPad in the same way as the kids so they know where they are or should be. Do as you want them to do.

Check for understanding
This is something that should happen throughout the lesson. It allows kids time to process and digest information. Teachers should provide multiple checks and do it between instruction to chunk - see above.

Guided Practice
Students are given time to work with the information. Support is present either in the form of the teacher or peers. Aaron is a big fan of Quizlet.

Independent practice
Time when the teacher is not available. With making info available on a website, the info is on 24/7. The student can work and review at any time.

Closure
This he feels is often the most underused step in learning. This is the time when students summarize and share what they have learned for clarification. To show understanding he has his students use a google form to write/respond with what they have learned.


- Posted using BlogPress from my iPad