Showing posts with label technology. Show all posts

May 20, 2016

Screenshots, Screencasts, and Animated GIFs

This week,  Maureen Tumenas wrote to the Techy Coach asking what I use to make GIFs and Videos for my Tiny Tutorials.  Over the years, I have found that teachers attending PD training want two things:
  • Step by Step Instructions
  • Visuals in the form of Screenshots or Animations
Being a visual person myself, I work best when I can see a process, better than if I were just to follow a set of instructions.  With that, I have worked to incorporate both video tutorials and Animated GIFs into my articles and posts.  There are some great tools out there.  In this article, I'll highlight the tools I use most, as well as a few others that are available to get the job done.

SnagIt by TechSmith


  • This Chrome Extension from TechSmith is a great tool for grabbing Screenshots or recordings in the Chrome Browser.  You can also create Animated GIF Files from your Video recordings.  While this tool has been handy, it is soon being retired from TechSmith.  While they are retiring it, you can purchase the full version of SnagIt from their website and get more information about the retiring of this extension here.  Personally, I'll be sad to see this one go, as it is a great tool!  But the full version has more bells and whistles and is worth the purchase.

Camtasia by TechSmith


  • Camtasia is a full featured tool that allows you to import audio, video, and images into a multi-track editing tool for the creation of studio-quality videos.  I use this for my Tiny Tutorials on YouTube and on the Techy Coach Blog.  This tool costs around $179.00 at the Education Price.  $299.00 for non-Education consumers.  I highly recommend this tool if you can afford it.

Photoshop


  • If you have access to Photoshop, you can create Animated GIF files without having to find an alternate program or software. Just open PhotoShop, and follow the instructions in the video below.  This will only work with static images, but if you have screenshots or pics for each step of the process you are trying to provide instructions for, Animated GIFs can be just as handy as a video.  


Screencast - o - Matic

  • If you're looking for a FREE tool to create screencasts, this is the one for you.  It works in browser, or you can download a launcher that allows you to record a screencast from your browser with audio.  


More Links for Animation and Video Tools

  • Screencast.com - Free online service from TechSmith
  • Jing - From TechSmith - captures short recordings or images or video. 


Apr 2, 2016

Share Links More Quickly in Google Drive

Sometimes as a tech-geek, I feel that technology providers change tools to the point that I feel spoiled.  But if there is a quicker way to do things, the lazy man inside me wants to find it.  Here's one for you.

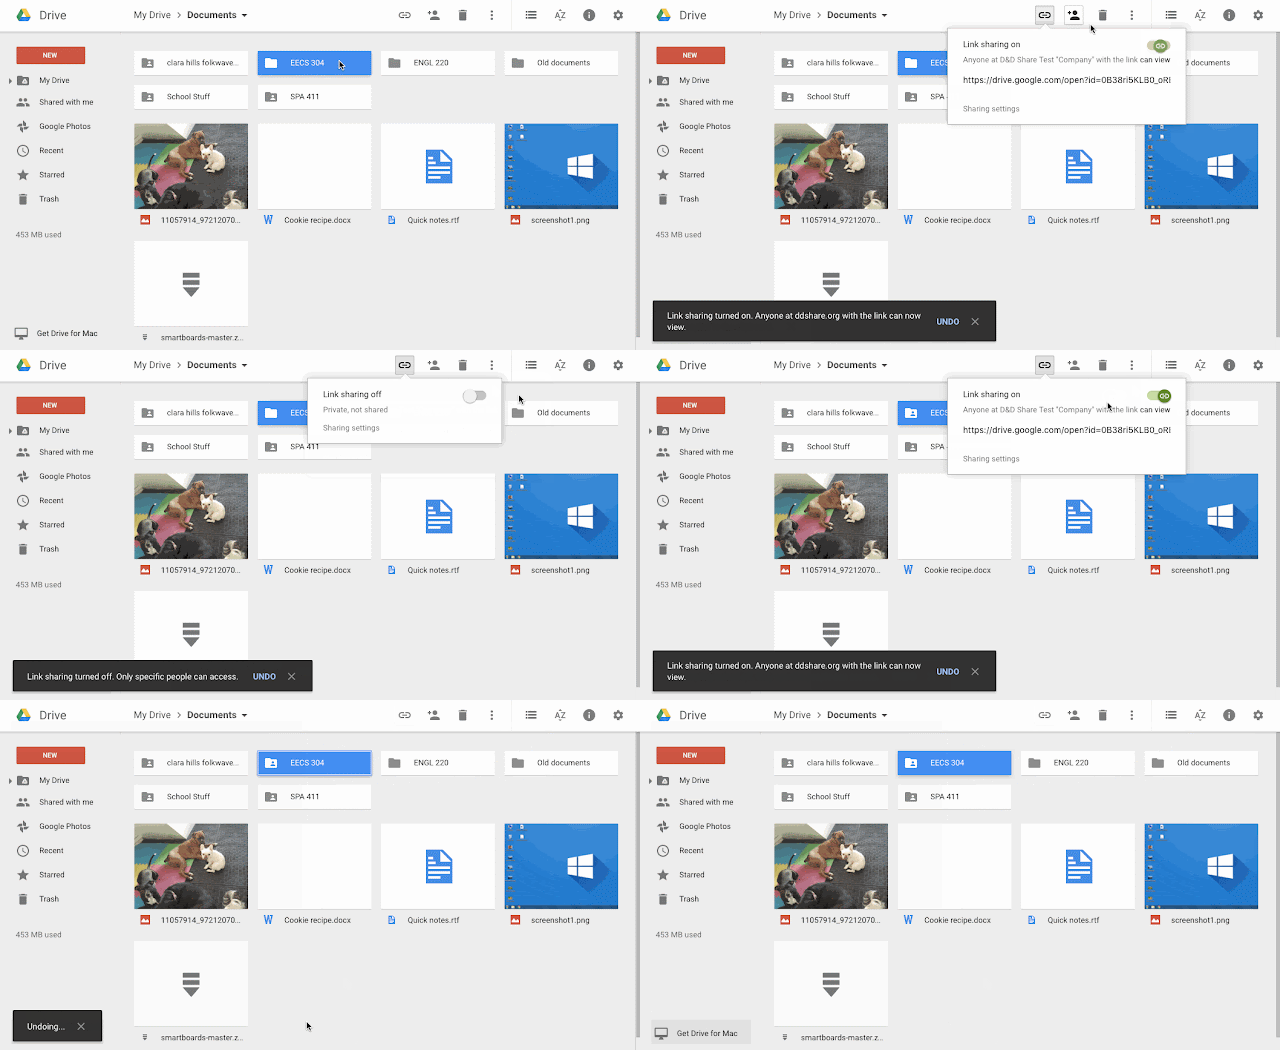
This week, Google released an update to Drive allowing faster link sharing.  Now, simply by selecting your folder or file, you can click the Link icon at the top of Drive, and get a link without the need to open the document and then open sharing settings.


The popup box allows you to turn on link sharing to "Can View" and copy the link  so you can share documents quickly.  


Conversely, you can also quickly turn Link Sharing off if it is already on and you need to make that change.


Jun 22, 2015

Google Sites vs. Google Classroom

Classroom vs. Site

This year, our district has made significant strides toward being a Google Apps for Education school district.  All of our faculty and students have their own Google Account and have been working to understand the benefits afforded by working in the cloud.

As we drew the year to a close we started Summer training for our English Language Arts teachers, as they would be receiving a Chromebook cart in each of their classrooms.  As part of that training, one of the questions that popped up was,  "Which is better? Google Sites or Google Classroom."

To answer that question, I've provided a few pieces of information for you (benefits of each), as well as a few videos to help newbies understand each tool:


Google Classroom

  • Teachers can assign students to their classroom.
  • Assign and grade work within the classroom.
  • Use the stream to post announcements or assignments
  • Link to Google Drive to assign work.
  • Add links to YouTube Videos
  • Add links to URLs
  • Allow students to post or comment (easy to disable)
Google Classroom


Discussion Forums using Google Classroom

Google Sites

  • Freedom to create the look and feel of a Teacher Webpage/Site
  • Add multiple pages
  • Link to Google Drive to add assignments
  • Create a File Cabinet to share files as a department
  • Create an Announcements Page to post thoughts and discussion topics
  • Embed any content you need (YouTube, Easel.ly, Etc...)
  • Add links to websites, etc....
  • Open site up for discussion boards
  • Embed a Google Calendar for a list of events
  • Have students create their own Google Site as a digital portfolio
  • Use a Google Site as a Wiki where students can work on group projects.  
Setting up a Google Site


Apr 9, 2015

Check for Understanding

Often it is difficult to get a grasp of student understanding when covering a new concept in class without having a one on one discussion with students.  But singling out each student to discuss concepts with them can take away from valuable class time.

One solution to this that I have used is to use a "Check for Understanding" checklist during Group Work.  To give you an example, I once taught a short lesson on Hydrocarbon Molecules.  As the students were working on a group activity, I wanted to check the understanding of each student so that I knew who was struggling and who had a firm grasp of the topic.  To do this, I created a sheet like the one below that I carried around on a clipboard:


Student Name: John Doe

Standard or Task
Rating of Student Understanding
1
Needs Improvement
2
3
Fair Understanding
4
5
Mastery of Concept
How many single bonds can be formed with a Carbon Atom?


What is the molecular formula for Methane?


What is an alkane?


What is a functional group?


What is a saturated compound?


As I moved around the room, I asked each student to explain or answer each question in the checklist.  As they answered, I would rate them on a scale of understanding of 1-5.  1 being a Needs Improvement rating and 5 being Mastery of Concept.


As I worked around the room, student groups could continue to work on the lab without interruption, but also with the knowledge that I was observing along the way.  When I finished, I collected all of the sheets and sorted them in terms of needs.  This allowed me to be more productive during class, while providing an informal assessment along the way.

As times change, so does technology, so I have created a digital form of this checklist using Google Forms.  


If you would like to use either of these, just use the links below:

Paper Checklist - click the link below to save a copy to your Google Drive account.


Google Forms Checklist - Open this file and then click File > Make a Copy to add a copy to your Google Drive account.


Mar 14, 2015

Tests, Quiz, and Review with Live Results

In the past several years, many different web tools have developed to help teachers administer tests and quizzes in the classroom. As schools advance further toward 1:1 computing and as schools go BYOD (Bring Your Own Device), administering tests has become easier.

Two of the best I have found for classroom use are discussed here:

Socrative

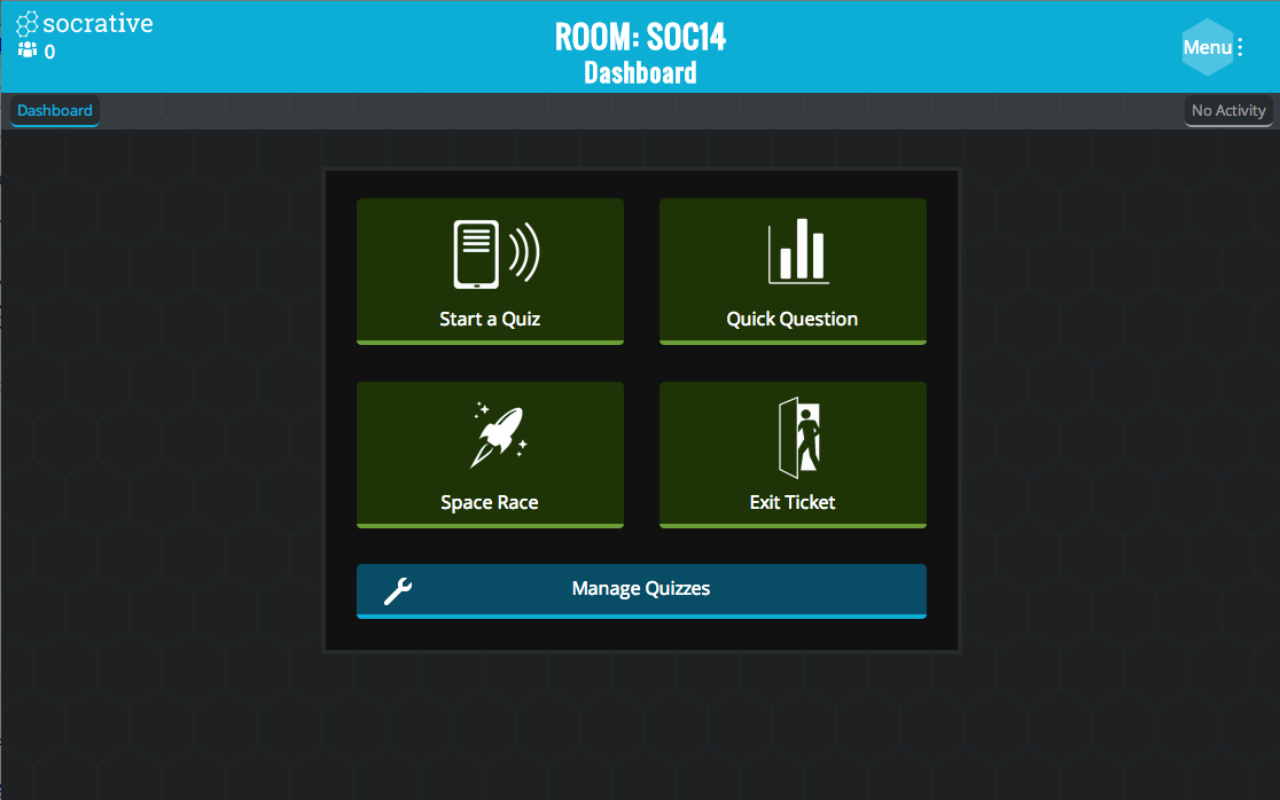
Socrative started out as an independent testing tool and was quickly snatched up by MasteryConnect.  It provides a free, simple to use interface that allows teachers to create and deploy their own tests.  Students can connect to assessments using any web enabled device (class computer, iPad, Chromebook, phone, etc...).

When you create your account, Socrative provides a Room number that students connect to.  From there, you can deploy pre-created quizzes/tests, or as a quick question on the fly.  Best of all, with Quick Questions, you can also allow students to vote on the best answer to create discussion.


Kahoot!

This site is great for stepping up student engagement.  If you've ever been out to a restaurant and you played trivia on the TV monitors supplied by the chain, then you'll get the idea of this tool.  We recently started using this during lunches to draw students into the cafeteria.  
Kahoot allows you to create your own question sets, or choose from over 1 Million public question sets over a wide variety of topics.  You can find something for everyone, ranging from Trivia Crack to Math and Science.  
Students can use cell phones or computers to engage with content.  A Game PIN is provided when you launch a question set and students join in by entering the PIN and a nickname.  A leaderboard shows the top 5 point earners to create a competitive spirit.  Great for reviewing for tests!

Jan 29, 2015

Learnin', Bloggin' and Makin' Videos

Recently, in the discussion board of my Differentiated Instruction class, we talked about different ways to teach students and ways for students to show understanding.  Much of the class focuses on student learning styles and as we talk about our own hangups in terms of learning.  

I run participants in the class through a discussion of what learning styles mean for students.  In doing so, we talk about how not all students are alike.  You will have some who are visual learners, others auditory, and some kinesthetic.  If you follow Gardner's train of thought, it can be more complex than that, but in either case, if you focus solely on an auditory means of teaching (standard lecture), you're going to lose more than half of your audience as your visual learners can't picture what you're saying and your kinesthetic learners - well let's just say they're itching to get out of their seat and out of the room!

To get teachers in the mode of understanding the impact, I have them take a Learning Style Quiz to see where they lie on the spectrum of learning.  Try these for yourself and your class:

After they take one or more quizzes to assess their style, I ask teachers to reflect on their own learning (what life was like in high school for them) and how they feel this impacts their teaching style.  As they do so, they start to see how some kids could easily be left behind (no that was not an NCLB reference) in the process of presenting content.  This quickly gets us onto the discussion of student work.  We discuss the use of  video content to present work in new ways that allow a bit of auditory and visual content. By creating your own content on video, you can flip your classroom and save time for other tasks such as projects and labs.  Take it one step further and get your kids to create content of their own -  a kinesthetic learners paradise!

Try these free and cheap tools to start creating your own content:


In order to know that your students understand what is being taught, you need to assess them.  Now don't get me wrong, I'm all in favor of a simple Multiple Choice test that can be auto-scored by a  computer, but let's face it - to gauge true understanding, kids need to show us.  So why not lend them a hand and let them collaborate!  Use the tools above to help them in creating content to show understanding.  Use a Rubric to grade the process.  

But sometimes, regardless of how content is presented, some students never understand on their own.  IF they stay within their silos, they soon become frustrated.  This is why collaboration is so important.   Collaboration is key in assisting with understanding, but also fostering creativity and generating new ideas.  By placing students into groups and stations, you can create an atmosphere that allows for true collaboration.  
  • Group work and stations - Get students to work toward assessing content, checking for mistakes, applying understanding by creating their own journals - but have them do it in groups that rotate through stations.  As students move through each station, they can work as a group to comment and correct material at each station.    When they move through stations as a group, they not only benefit from the work of their own group, but the ones who have rotated through the station before them, as they begin to dissect comments and corrections made by others.  
If you don't have the time, but you have the technology, have your students work in collaboration outside of the classroom in a Discussion Forum.  Discussion Forums are great for vetting new ideas, Q&A sessions, help with homework, or just simple project collaboration.  Here are a few resources to help you get started:

Discussion Boards:
  • Today's Meet - https://todaysmeet.com/ - If you'd like a simple backchannel style discussion thread that students can interact with in realtime, Today's Meet is a great free option.  You can setup a web link for them to access, and you can choose how long you want it to stay open.  You also have the ability to download a copy of the discussion to print.  
  • Piazza - https://piazza.com/ - Great for Q&A style discussion between instructor and students.
  • Google Classroom - Must be a Google Apps for Education district to use this http://www.alicekeeler.com/teachertech/2014/09/07/20-things-you-can-do-with-google-classroom/ - Use this tool to do a whole host of things, including the ability to comment and post questions.
  • Google Docs as a Discussion Tool - https://www.youtube.com/watch?v=Pn6ZQB6fuQM - Google Drive/Docs is a free tool, so why not use a Google Doc as a discussion tool.  Watch this video to learn tips!

Finally, there is no greater way to get kids to show understanding than writing.  Blogs can help.  If you want to call it journaling, you can call it that too, but in either case, the very act of writing gets students to hash out their ideas and thoughts.  Assign students activities that they have to blog about.  One great way to do this is to have kids create technical instructions.  Give them the task of explaining a concept such as math or scientific procedure in such a way that their English teacher can understand it - and do it on a blog or discussion forum.  This idea came from a workshop on literacy integration in our school.  Wonderful idea!
Blogs:
What does all of this have to do with learning styles?  That's where we started, right!  Well, as a kid, one of the things I always hated was taking tests.  And creating dioramas - don't even get me started.  I was the type of kid that would blow it on a test, but I could always write a great essay (that may not always be evident here).  I hated making dioramas or cell projects in science, but I could make a mean poster!  A student's learning style has a great deal to do with their strengths.  Some kids are very musical/rhythmic, so why not allow them to show understanding by writing a poem, song, or dance.  Others are very visual, so whay not allow them to use that to create visuals that teach others through use of a cartoon.  

Allowing students to play to their strengths seems very simple, but many teachers don't want the complexity of grading  a hundred different projects.  My answer is to go back to rubrics.  Design a simple rubric around the concepts/standards you want students to focus on in the lesson.  Then use those key points to grade their project - not on creativity or pieces such as number of slides in a powerpoint, but their ability to relay content in such a way that others can understand it!  

So what if you receive a myriad of different projects, in all sorts of media formats! Allowing students to use their creativity means they will have more fun with it and possibly learn something in the process.  Think about this - what are your most memorable projects from school?  Were they the ones that allowed you more freedom to create in your own way, or were they the ones that forced you to do the same thing everyone else did?  

Now go with that thought and teach your kids!


Oct 7, 2014

Technology Trends and the Implications for Teachers

This article is probably overdue, as we are already more than halfway through 2014. But as the school year is still fairly new, I thought it was worth addressing. As educators know already, the past five to ten years have created a sizable shift in technology, instruction, and the way students learn.  As we have moved from an era of flip phones to carrying around small computers in our pockets, it is clear now more than ever, that technology changes have given us the ability to teach in ways we have never been able to before.

The difficulty is that we are also thrust in an age of confusion.  There are so many new ways of integrating technology that the educational environment has become chaotic.  Which new technology should schools buy?  What trends do we listen to? Do teachers abandon old practice for something they are unfamiliar with only to find it doesn't work?

The key thing teachers and schools need to remember is that change should not be something that is rushed into.  We need to take advantage of the experience of others and the vast amount of research that has been done in terms of educational technology.  A big fear is that technology is replacing teachers.  Nothing could be further from the truth. Although technology has changed, students will still need teachers as a guide, facilitator, and purveyor of learning. Not all of our students are technologically savvy or are as advanced as others in terms of content. Rather, technology now affords us the ability to differentiate education in ways that allows us to cater to the needs of all learners.

All this being said, I am using this soap box to pass on a few key information sources that can be valuable to teachers and administrators:


  • New Media Consortium Horizon Report  - This yearly report defines up and coming trends in technology for the next 1-10 years and the impact those changes will have on teachers, teaching, and education.  Pay particular attention to page 6 covering teacher roles and page 32 covering important developments in technology for schools. 

  • Edutopia - Technology Integration - The George Lucas Foundation funds this website which focuses on providing best practices for educators. This specific link covers all articles on Technology Integration in the classroom.  Everything from Differentiated Instruction to The Flipped Classroom can be found here. 

  • Google Educators of Oklahoma - Facebook - this facebook page was set up for teachers in our district to stay apprised of new changes to Google Apps for Education as we make the shift to Google. It was expanded to the state to allow anyone to keep on top of Google updates. Articles are curated from many sites around the globe. 

  • Edudemic - This site provides articles covering many different topics in education, most of which are related to technology integration. 

  • Sandite Exchange - PLCs - this in district site was developed for our teachers to share and exchange ideas. The PLC page, still in its infancy, is growing as we add more resources. If prompted to login, choose login as a guest. 


Hopefully these resources help you and your fellow teachers in finding valuable resources regarding technology integration. As trends change, use these resources to stay on top of things.

Sep 28, 2014

Build Your PLC by Putting the Internet to Work For You


Recently while teaching an online class on Differentiated Instruction, I found that many of the teachers involved in the class had gotten the fire in them and were excited about finding resources and implementing DI in their classroom.  Rather than let them leave the class with no path to keep them going, I put together this list of resources the help them find what they needed.  

The emphasis I placed on the end of the course was for them to build their Professional Learning Community.  Finding the resources to help students starts with building a Professional Learning Community.  There are tons of resources out there and it can be daunting.  My solution is to put social media to work!  Here are a few places on Social Media to start:


There are other tools you can use to gather your newly found resources in one place so they are easier to digest.  Some of these tools, I have shared in previous articles, while others are new.  I hope you find them useful:  


  • ScoopIt! - This tool lets you choose topics and websites so you can digest all those articles out there on the topics you are interested in.
  • Flipboard - Similar to ScoopIt, you can gather twitter feeds, facebook pages, magazine articles and websites into a magazine style resource so you can put all your interests in one place.
  • IFTTT - When sharing what you have found, you can use If This Then That (IFTTT) to put recipes together that make your life easier.  For instance, if you post a resource on YouTube, you can have IFTTT automatically let your fellow teachers know on Twitter.  If a new article pops up on twitter with the topic "iPad Tips", you can have an email sent to you.
  • Paper.li - turn your twitter feed into a paper that publishes daily, then have an email sent to you so you can read all your favorite resources like a newspaper.
Finally, if you've never used these resources before, here are a few websites dedicated to making the teaching profession better
  • Edutopia - The George Lucas Foundation has a vested interest in helping teachers learn and grow to help students.  Visit their site, or create a free account so you can keep up with trends in education.
  • Edudemic - This site provides resources for teachers and students with the goal of infusing technology into the classroom.  Check this article out on their site to start http://www.edudemic.com/great-edtech-twitter-chats/

Sep 11, 2014

Google Apps for Teachers

Recently, our district decided to make the switch to become a Google Apps for Education (GAFE) school.  We are in the middle of the transition and are slowly adding teachers to our district account, one site at a time.  This transition has made things simpler for me, and the discussion that I have had with several teachers has gotten them in the mode of thinking about how Google could be leveraged to making their lives easier too.


The difficulty I have had is helping them understand just why they should use Google Apps.  The biggest and best answer I can give is that Google allows the following:


  • Free Cloud Storage - 15GB for a Free user, 30GB for a GAFE Teacher
  • Access to Google Drive
  • Real Time collaboration - share docs and collaborate from anywhere at anytime with an Internet Connection
  • Google Docs - word processing in the cloud
  • Google Forms - for quizzes and tests
  • Google Sheets - for collecting and sharing data
  • Google Slides - convert your PowerPoints into slides and access them from anywhere.
  • ...and the biggest...NO NEED TO CARRY AROUND FLASH DRIVES ANYMORE!
To help our teachers learn how to use these apps, I have created a few tutorial videos that I wanted to share with everyone.  

Google:  An Introduction


Google Docs


Google Forms


Google Slides


Beyond these videos, there are several links that will help new users keep up with Google News:

Google Gooru - http://www.googlegooru.com/
Google Educators - Sand Springs - https://www.facebook.com/groups/GoogleSSPS/
The Official Google Blog - http://googleblog.blogspot.com/

Hopefully the videos and the links will help you as you Go Google!

Dropbox and the Paperless Classroom

For teachers that want to go to a paperless classroom, the one drawback is finding a free solution that allows you to distribute work and still collect work without complication.  Many teachers have a dropbox account and have created public folders so that students can submit work.  The problem with this is that students can see everyone else's work, which leads to problems with academic integrity, cheating, and plagiarism.

Today, I ran across a great solution that will help teachers using Dropbox.  This tool is called Jotform.  If you go to Jotform.com/dropbox, you can create a form that allows students to submit assignments to your dropbox account.  Its pretty simple as long as you already have an existing dropbox account and you use the link above.


To get started, you'll first need to go to http://jotform.com to create an account.  Then, follow the instructions below to create your dropbox form.


  1. Go to http://jotform.com/dropbox.  
  2. Click the "Create a Dropbox Form" button.
  3. You'll be asked to login to your Dropbox account and link it to Jotform.
  4. After linking the two accounts, you'll get a link and an Embed code you can use to post your form online. 
  5. A form template has already been created, so all you need to do is click Next when prompted.  
  6. After the process is complete, close the popup window and go to My Forms.  You can see and edit your form at any time.

After you create your form, you can always go back to Jotform and find your Embed Code and URL for sharing.  You can also edit this form to include collect other information such as Class Period, Grade, etc....  If you click the Integration button, you can also integrate other services besides dropbox.  

Once your Dropbox account and your Jotform account are linked, you will see a new folder in your Dropbox account called "JotForm to Dropbox".  You'll want to test our your new form for the first time after creating it.  

This is a great alternative if you are not a Google Apps for Education school and you are a religious dropbox user.  My suggestion would be to create a separate dropbox account apart from your personal one that is used only for your classroom.  Then start collecting student work!

Jul 18, 2014

QR Codes and Back to School

It's a little soon to be talking about the first day of school, I guess, but a class I taught today got my mind going about back to school.  In a class on QR Codes, we were discussing the different ways that QR codes can be used in the classroom.  When you take into consideration that mobile devices can open up so many options for learning, QR codes seem an obvious pathway to providing tips, hints, or answers to frequently asked questions.  But as we talked it became evident that one clear cut solution for back to school is to provide a QR code for new students and parents.  That QR code could be a link to:
  • your syllabus
  • a supply list
  • an introductory video
  • a guided tour of the school/classroom
In order to create your own code and provide access to these and other pieces of information, you need to keep a few things in mind.  

First, where will you store your information?
  • Google Drive - Store documents and slideshows in your cloud based account.  Just make sure that in your sharing options you have set your document so that it can be viewed by anyone with the link.  Click Share and change "who has access" to "anyone with the link".
  • YouTube - Any video that you create for tours or introductions to your parents and students can be stored on your YouTube channel.  Just copy the link to share.  
Second, how can you create your QR Code?  Make sure you copy your link from the item you want to link back to from your code, then go create a code on one of these sites.  
Third, before you post your QR code on your website or print it off and post on your classroom door, make sure you use a QR Code scanner to test your code:

Finally, make sure when you print off  your code or post it, you do the following:
  • Let users know what information is being shared (i.e., Syllabus, supply list, Meet the Teacher Video)
  • Provide users with a link to a QR Scanner if they don't have one.
  • Print or post it large enough that it is easily seen and easy to scan.
Here's an example of a QR Code linked to a Back to School Doc:


QR Code
When you create your code, post it on your door so that parents and students can scan it during schedule pick up or meet the teacher day prior to the start of school.  If you do this, you have the satisfaction of knowing that your students will have easy access to a supply list prior to the first day of school.  Plus, your parents will love you for getting this out of the way early!

Jun 26, 2014

ISTE 2014

So today I head out of town to Atlanta for the ISTE 2014 conference.  I can't wait to get there.  This conference is always so full of information, I never have time to gather it all together, but I always know I will come back with some valuable information.  As always, I will be posting articles about each session I attend.  Hopefully the few of you that follow me will find this information handy.  My goal this year is to increase my postings on this site in an effort to get my thoughts down and create a knowledge base for questions that teachers have throughout the course of the year.

ISTE

If you aren't familiar with the ISTE conference or the organization, I highly recommend you check it out. ISTE is the International Society for Technology in Education.  Formerly known as NECC (National Education Computing Conference), ISTE has generated a large knowledge base of information regarding technology for the classroom.  Additionally, they are at the forefront of developing standards for computer science in the classroom and technology in teaching.  My primary interest is as a Professional Development teacher and Instructional Coach.

If you've never checked out their site, do so - https://www.iste.org/  .  While there, check out their standards page - https://www.iste.org/standards.  They have written standards for:


All of the information on these pages is very valuable in guiding technology instruction.  Check it out.

Also, don't forget to check back here this week for my posts on ISTE 2014 Conference Sessions.


Jun 26, 2013

Coaching for education transformation - #ISTE2013

This presentation was a panel discussion focusing on teachers as technology coaches. Technology coaches have been found to be the most effective form of professional development. The benefit of a coach is that they provide a safety net to teachers who need assistance in technology integration.

Elements of Effective Coaching:

- Building relationships with teachers. Knowing the tech is part of it, but building rapport is important.
- Making the discussion/tech relevant
- Reflection. Have teachers reflect on what was effective, successful. Coach reflect on training - what is successful
- Build trust. Teachers need to feel that they can rely on coaches.
- Observation. What are their behaviors? What could they be doing differently in the classroom.
- Teachers are looking for a peer, not a trainer or supervisor. Coaching is a two way street.
- Start with those who are comfortable working with a coach.

Elements of Ineffective Coaching:

- Do not enable a teacher. Some teachers want you to come in and teacher the kids how to use a piece of software. Coaching is not teaching the kids. Coaching is teaching the teacher and modeling so they can be empowered to teach.
- It's not about the tool. It is about the end result. What do you want to do?
- Leaving out the high flyers. If you leave out the ones you assume are tech-learned, you will create a wall in which they feel left out. Work with all levels.

How do the roles of coaches impact highly effective digital age teaching and learning?

Digital learning allows independence among student learners. Coaching teachers in digital learning means that teachers can differentiate in challenging situations. Teachers are looking for solutions. Technology for the sake of technology is not what we are saying, but embracing new skills to provide solutions will make teachers more effective.

As an example, when implementing iPads in a district, it was found that having peer coaches allowed teachers to use iPads more effectively than if they had minimal training or if just given iPads with no training.

Evaluating Coaching:

Developing a portfolio for teachers is a good way to show growth. Focus groups also allow teachers to discuss needs, ask questions, and work with coaches to evaluate new tech. Developing an evaluation tool so teachers can evaluate their own experiences can be helpful - during pre and post training.

The most effective coaches are those who still work in the classroom, or self nominate and go through training.

How does effective coaching transform education?

Coaches don't always play the role of expert. This puts you in a position where teachers will sit back and have you do all the work. This creates learned helplessness. The solution is to create inquiry. What would you do? How would we solve this? This way allows the teacher to own the solution. The goal is to help them learn the capacity to solve their own problems. Coaches model collaboration which allows teachers to pick up those skills shown or discussed. Coaches help to develop networks of learning (PLNs).

Also, coaches need to work closely with principals. How does coaching fit with school improvement plan? How does coaching fit with school goals? Have a meeting with each principal so that the coach receives the proper support and the principal is able to receive information about the good things that are coming from coaching.

The best way to use technology is through inquiry. Ask questions. By modeling what they should do with their kids, you help the teacher teach the kids about self directed learning and inquiry.

What are the challenges to creating and sustaining a coaching model?

Time- It's great if someone has the primary job of coach, but this is not always possible. Some coaches work on release time. Work with administrators to remove some of those time barriers. Sub time works, as well as an extra plan hour dedicated to coaching.

Training - There should be training up front and professional development to build coaching skills in order for them to be effective.

Staff culture - Developing a rapport or trust with teachers is important. It takes time and support from the administration to develop a culture which establishes an effective coaching relationship. Communication of the impact of coaching - portfolios, successes, etc - is important to developing culture as well.

Resources:
-For ipads and reading, check out - http://fusd1.org/iread
-ISTE has a special interest group for teachers - #SIGETC
-Backchannel for discussion - http://todaysmeet.com/ISTECoaches


- Posted using BlogPress from my iPad

Jun 25, 2013

Beyond the Apps: A Pedagogical Approach to the iPad #ISTE2013

This session was presented by Aaron Svoboda, secondary learning coach, Kearney Public Schools
@Mr_Svoboda

The presenter starts by saying that he is tired of attending workshops where the speaker just talked about neat apps or "hey there's an app for that!" discussions. He feels there needs to be more meaningful discussion on designing lessons with the iPad. He is big on Madeline Hunter and promotes the principle of pedagogical design and purpose driven learning.

Check out his site here: https://sites.google.com/site/svobodagct/beyond-the-apps

Why ipads?
-In terms of a modes of delivery, he uses Wikispaces or google sites.
-Kids want to use the iPad, so it automatically engages them.
-The iPad provides a contained learning environment - everything is right in front of you.

Tools he uses:
-Quizlet
-Youtube
-Safari montage
-Socrative
-Mentimeter

Anticipatory Set
When working with kids, he starts with an anticipatory set. Question them and give them an activity or discussion topic to start with. It can be a quiz or a sharing of ideas using one of the tools above.

Objectives and Purpose
Then he moves on to the objective and purpose. Not necessarily what you're doing as much as why. He uses Google Forms to get feedback from students on their level of understanding on an objective. Allows them to interact with the objective.

Instructional input
Ways material can be delivered:
-Slide Decks
-Video
-Text
-Field trips
-Slide Share
-Google presentations
-YouTube
-Google docs video
-Websites

Tips for instruction:
Chunk instruction. Break up topics with activities; provide opportunities for understanding.

Modeling
Demonstrate understanding to your kids. In terms of the iPad, the teacher should be using the iPad in the same way as the kids so they know where they are or should be. Do as you want them to do.

Check for understanding
This is something that should happen throughout the lesson. It allows kids time to process and digest information. Teachers should provide multiple checks and do it between instruction to chunk - see above.

Guided Practice
Students are given time to work with the information. Support is present either in the form of the teacher or peers. Aaron is a big fan of Quizlet.

Independent practice
Time when the teacher is not available. With making info available on a website, the info is on 24/7. The student can work and review at any time.

Closure
This he feels is often the most underused step in learning. This is the time when students summarize and share what they have learned for clarification. To show understanding he has his students use a google form to write/respond with what they have learned.


- Posted using BlogPress from my iPad