Showing posts with label Google Sheets. Show all posts

Mar 30, 2017

An Interactive Notebook for the Digital Classroom

Recently, while teaching an online class covering Differentiated Instruction, several discussions turned to the topic of Interactive Notebooks.  As a learning/study tool, Interactive Notebooks have been handy in terms of allowing students to culminate resources, integrate visuals, and prepare for exams.  But as the digital classroom continues to evolve, finding ways to move Interactive Notebooks from page to screen have become necessary.

With the new update to Google Sites, this opportunity has never been greater.  Google Sites provides a platform allowing students to create an online notebook that can include interactive and video content.  

Here are a few ways that you can create an Interactive Notebook using Google Sites...


Setting Up Your Interactive Notebook

The best way to insure that students get the most of their online interactive notebook, make sure to provide some guidelines for setting up the Google Site.  You can walk them through the process or you may even want to look into developing a template they can use.  In any case, here are a few tips on getting started:

A Page for Everything

If you need to add more pages, just click on the Pages menu and add it.  Have students create a page for each unit  you cover.  Pages can include items such as:

A Launch Page - 

Students should include information about themselves, as well as the course, class period, and links to each page on the site.

A Gallery of work - 

Have students store photos of their unit work, or documents in a Google Drive folder.  Then, add the folder to a Google Sites page.  If displaying photos, set the folder to a Grid view for easier viewing.


Links for Study

When teaching a unit, you may share a lot of links that students can benefit from.  Encourage students to save those links by adding them to a page on their Site.

Flash Cards and Study Tools

Do you use flash cards as a study tool?  Try adding links to your Quizlet  or Flippity Study Sets. 

Videos for Teaching and Learning

Have students gather resources to help them study.  Teach them to search and share videos that may help them prepare and supplement learning on the unit you are covering.  YouTube has tons of great resources.  Search for channels by teachers that cover the subject you teach. Help students understand the difference between a good and a bad resource before they start culminating a library.

Review Tool for the End of the Year

Once you've gotten started, you can teach students to create a new page for each unit you cover.  Throughout the year, students will have a site they can use to build on and add knowledge to their understanding of concepts.  By the end of the year, they will have a tool they can use to review for final projects and exams.  

Take a look at this sample site - https://sites.google.com/view/techybio/home

Grading Interactive Notebooks

If you would like to grade students on the work they put toward their Interactive Notebooks on Google Sites, you can create a Google Sheet in which you gather and keep information on each student.  This can be a launching page to take you to each student's notebook and allow for easier grading.  Students will need to publish their site and make sure it is viewable by you.  Then they can share the link to their site with you.


You can also create a Google Form  you can use to grade each student's progress on notebooks. Each question in the form can cover information in your grading rubric.  Use Linear Scale questions to rank students on each objective in the grading rubric.  

Create a Rubric using Forms

Are you new to Google Sites?  

Try this video to introduce you to the New Google Sites so that you and your students can learn more about how to use this versatile tool!


Feb 23, 2017

New Features for Google Sheets - Text Rotation, Border Tools, and More!

Today, Google released a few new features for Google Sheets.  These include some long awaited tools that include:

  • Text Rotation
  • Extra Border Options
  • Accounting Number Format

Watch this quick tutorial to see these new features and how to use them.


Nov 22, 2016

Digital Badges Part 2: Creating a Leaderboard

In the first part of this series, I explained how the use of digital badges in District Online Professional Development has taken off.  In this article, I explain how I set up our Badge Leader-board.

In our district, I have had a great response to professional development, and I wouldn't necessarily guess it is because of the badges themselves - although many people like to have that tangible (digital) item to show they have completed something.  No, I believe what has created such a surge in online PD is the leader-board!  Some people in general are naturally competitive - they see that others are involved, and they want to be at the same level - or greater - in terms of training and understanding.  As a result, I created our leader-board to show how many and what type of badges have been earned by each building/school site.  Each week, I send a reminder of which school is in the lead.


I created our leader-board using Google Sheets, and then posted (embedded) my Google Sheet on the Google Site we use for Professional Development.  This allows those who have completed /earned a badge to show off their name, and allows everyone to see who is in the lead.  

This video explains how I set up our Google Sheet/Leader-board.  Enjoy!


Nov 1, 2016

Google Apps Script - Create an Email Button in Google Sheets

As part of my job, I work with students who take courses online with our school.  As a result, many students are working from home or completing these courses on their own time, while meeting with us on a regular basis throughout the week.  To be efficient, and also maintain communication, we wanted to have a way to log regular student progress, while also communicating weekly progress to parents and counselors.

This could have easily been accomplished by creating a Google Form, with a place to enter:

  • Student Name
  • Date of Meeting
  • Progress Comments


However, this would mean that every student entry would be entered in the same form, and likewise, would be logged in the same Google Response Sheet.  This simply would not work, as we wanted parents and students to have the ability to view long range progress and track performance.

This meant the creation of a Google Sheets Template that I would copy for each student, and then share or email to the parents and counselors each week.  


The problem this created was that, when meeting with students each week, much of my time was spent entering comments, grabbing the link to the document, going to Gmail, typing up a message, and then pasting the link into the email.  First World Problems, right?!?  Even with a Canned Response in Gmail, this still amounted to a lot of wasted time that could be spent counseling students.


In comes Google Apps Script.  Now I have a simple button on each Google Sheet that I can click after entering comments.  This button takes care of all the extra steps I used to spend as described above.  Watch this video to see what I mean.  Modify the process to create your own workflow and apply it to your own specific tasks.  Give me some feedback in the comments section and tell me how you are using this idea.


Oct 10, 2016

Docs, Sheets & Slides - Sharing Student Presentations

This week, a question from a teacher asks:


"I have posted student presentations that they have made using Google Slides, but for a parent to view these..it says they have to sign in with a Google Account.  Is there any way to do this so they don't have to have a Google account to view these presentations?"
 This is a very common issue and can easily be resolved. The thing to keep in mind anytime you are posting Google documents on the web is to make sure you setup sharing rights properly.  

Before posting any items to the web:

  1. Click on the Share Button
  2. From the pop up menu, click Advanced.
  3. Under "Who has access" click Change
  4. Select "Anyone with the link"
  5. Under Access, select "Can View"
  6. Click Save & Done


After you have set your document up this way, you can post it to a website using an Embed Code or link by using the Publish to the Web option in the File Menu:

  1. click File
  2. Choose Publish to the Web.
  3. Click Publish
  4. Choose from a Link or the Embed (HTML) Code.


This is an easy way to share documents on the web - Docs, Sheets, or Slides - and a great way to present information to your audience.  

One key thing to remember when posting student work is that you secure permission from parents or guardians to publish student work on the web.  You might check with your principal regarding permission slips or a student contract requiring parent permission to share student work.  For example, a slip sent home similar to the following, would be a good way to get parent authorization:

Parents,  This school year, we will be using Google Apps for Education in the classroom.  Google Apps is a free suite of tools available to schools that includes Gmail, document creation, presentation tools, and other collaboration tools.  As part of that process, from time to time, we may have the opportunity to post student work on the web.  The school will work to make sure student work is shared in the safest way possible, but we want to make sure you are aware and that we have your permission to do so. No student grades will be posted.  As part of that, please sign and date this slip granting the school permission to post examples of your students' work for your viewing.


Parent Signature _________________________________________ 
Of course many districts already have a technology or internet use agreement in place, as well as permission slips for use of Google Tools. If you do not already,  you may want to do so.

Happy Sharing!


Sep 30, 2016

Learn from the Google Sheets Explore Button

Just yesterday, I posted a few tips about using Google Sheets.  One new item about Google Sheets that just keeps getting better is the Explore Button.  

If you haven't noticed this little gem, that's because it is hidden at the bottom right corner of your Sheets screen.


While the Explore button has been there for a little while, it has recently gotten a few updates.  Let's take a look at what the Explore button can do...

Get Answers About Your Data

One really cool features in Explore is the Answers section.  At the top of any Explore pane, you will see a search box that says, "Ask a question about your data".  So for instance, with the demo sheet available with the new explore button, there is a great deal of data about the World Cup.  You could simply type in "Who was the winner?" and get a quick answer about that data.


Learn from the Formula

Want to know how they did that?  With any question you ask you can click See Formula and see the Sheets formula used to find the data related to your question.  For example, in a question about who the winner is, Sheets uses the unique filter to arrive at the answer:  

=UNIQUE(FILTER(D2:D21,D2:D21<>""))

Once you find your answer, and view the formula, you can click on the formula and it will be copied to your clipboard so you can use it and apply it elsewhere.  This is a great way to learn more about the use of Functions and Formulae.


Add Formatting Quickly

In my previous post (5 Tips for Google Sheets Users) I discussed some of the simple formatting you can do to your Sheet.  For example, there is a quick way to add alternating colors to your sheet.  Want to save a few steps?  Use the Explore button.


Insert Charts In A Snap

You can also get suggestions for Data Charts and Graphs quickly.  Just click on Explore, find the chart or graph you want, and click & drag it onto your Sheet.  You can also click the Pencil on the Graph to quickly edit or make changes to your new Graph.  


Sep 29, 2016

5 Tips for Google Sheets Users

Not many out there will admit to being spreadsheet fanatics, but I gotta say - I love spreadsheets.  There was a time when the mere mention of a spreadsheet made me cringe.  But now that I know more about them, I use them all the time.  For those of you that are just starting, check out my tutorials on Google Sheets.  Then grab these 5 tips to help you be more productive.  


Alternate Table Colors

If you love Table Formatting in Excel, you've probably looked for it in Sheets.  There are often times that you need to be able to discern between one row of data and another and you scan your sheet.  To make it easier on your eyes, just Highlight your rows, click on Format, and choose Alternating Colors.


Simple Database Using Links

Since there is no Microsoft Access alternative in the world of Google, you have to get a little creative to create a database.  Sometimes just being able to link between sheets can be necessary.  To get really complicated with linking sheets, check out this video.  But for a simple solution, just highlight a cell, and click Insert > Link to add a link to  a URL or another Google File.  Don't know the link you're looking for?  You can search for it.  You can even search your own sheets in Drive as a link. See below.  


Search Across Workbooks in a Sheet

Too many workbooks in a Sheet can create an issue when you are trying to find information. To do this,  Click CTRL+F.  Then click the More menu (3 dots).  Make sure to set search to All Sheets.  Then search for your keyword or term.


Quit Scrolling Back and Forth - Freeze Your Sheet

When you have a great deal of data across columns, the last thing you need to do is scroll back and forth or highlight rows to make sure you are looking at the right line of data. Save yourself some hassle by freezing columns or rows as needed.  To do this, Click View and Choose Freeze.  You have the choice of freezing 1, 2 or more rows and columns.


Get Notified!

Need to stay up to date on when information is added to a shared form?  Maybe you are collecting data on student progress and have shared your sheet with another teacher or two.  As they add information to your shared sheet, you can save yourself the pain of checking back over and over again for changes by setting up notifications.  To do this, click Tools > Notification Rules and make your selections.


Sep 21, 2016

Tracking Student Progress and Attendance in Google Sheets

This week, a question to the Techy Coach asks how a coach or teacher might use Google Sheets to track student progress, as well as attendance.

From this I know that there are many times as educators that you want to log data regarding student performance.  Specifically you may want to track Reading Fluency or Cross Country/Run Times, while still having the ability to see a visual of their progress over time.  Google Sheets can help with this, as well as Attendance needs by using a few simple tools.  The video below will specifically cover:

  • Sparkline Charts
  • Data Validation
  • Conditional Formatting
Take a look and see how Google Sheets can help you with your club sponsor and coaching needs.  Design  your Google Sheet to fit your needs, then once you have your sheet setup, you can access it on a phone or tablet as you meet for practice or meetings.


Aug 21, 2016

Google Apps Ideas for Elementary Teachers

This week, I will be sharing Google Apps tips with some of the elementary school teachers in our district.  I thought I would also share it here in the event that it benefits someone else.

Look for tips on Google Calendar, Drive, Docs, Sheets, Slides & Forms.  Slides include links to Video Tutorials and Sample Material.


Jul 19, 2016

Timesaver Tip: Track Student Progress This Year

We all know that, as a teacher, time is a commodity that is hard to come by.  So to help you out as we approach a new school year, I'll be sharing a few posts on tips you can use to save time in the classroom.  The first of those will focus on tracking student progress. 

Many teachers have the need to track student progress over the semester, so that at the progress reporting period, they can assess whether a student has made gains or has shown a drop in their skill level.  This can be with reading, math, or almost any subject.  

But finding the time to assess each student and track data over a long period of time, without taking a huge amount of time out of your schedule can be difficult.  To make this task easier, try using a spreadsheet in Google Sheets.  There are tools available that can make the job of logging data, tracking it, and visually identifying trends, a piece of cake.

This tip utilizes Google Sheets, Conditional Formatting, and Sparklines.  If you aren't familiar with these tools in Sheets, don't worry.  The video below will explain everything.


Jun 13, 2016

Tablet Friendly Pixel Art with Google Sheets

For those of you that follow the Techy Coach Blog, you may remember that back in March, I posted an article on creating a Pixel Art template with Google Sheets.  Pixel Art is a great way to introduce kids to Google Sheets, and its just fund to play with!  If you missed that article, here it is... http://www.techycoach.com/2016/03/create-pixel-art-with-google-sheets.html  

That article also included a template you can download and use.  This morning,  I was thinking about how if you were to use this template on a tablet,  you would constantly have to use the popup keyboard to enter numbers in each cell so you could create Pixel Art.  As an update, this tutorial explains how to use Data Validation to add a dropdown menu to each cell so  all you have to do is click and choose a number.  This makes the Pixel Art Template very Tablet-Friendly.

If you want a quick tutorial on how to update your Pixel Art Template, here it is.


If you missed the original video, check out the article link above to start from scratch.

Jun 9, 2016

Creating a Rubric Using Google Forms and Autocrat 3.0

One of my favorite Add Ons for Google Sheets is Autocrat.  Recently, New Visions Cloud Lab released an update to Autocrat - Version 3.0.  With this new version, users get a slick, easy to use interface, along with a few new features.  

As this new update is rolled out, I recently updated my tutorial on Autocrat to show how to use Forms, Sheets, and Autocrat to create a Rubric for grading Oral Presentations.

In the past, when grading student projects or presentations, I had paper copies of my rubric scoring sheet clipped to a clipboard, and I would score each presentation, handing students their copy at the end of class.  However, this meant that I either had to photocopy them so I had my own copy, or I had to fill it out twice.  

With Google Forms, Sheets, and Autocrat, creating a digital rubric means:

  • I can use a tablet or phone to fill out the rubric as students present.
  • I can provide students with immediate feedback via email.
  • I have a spreadsheet of all scores I can reference at any time.
  • I am paperless!
So without further ado, here is the tutorial on how to set up your own Rubric with Google and Autocrat.  Enjoy!


Jun 8, 2016

Double Up Security For Shared Google Files


When sharing files with other on Google Drive, you may find that in certain situations, you need to limit how others access your files and folders, and for how long.  For instance, you may want to:

  • Share files for a limited amount of time.
  • Prevent users from Sharing your files with others.
  • Prevent users from downloading, copying or printing your files.
Luckily, Google has security features that allow you to do just that.  To change these features:

  1. Click the Share button in any Doc, Sheet, or Slide.
  2. Click on Advanced at the bottom right of the popup.
Each of these features is outlined in the videos below.  At this time, these features are only available to Google Apps for Education and Google For Work users.

Happy Secure Sharing!

How to Limit Access Features for Shared Google Files


How to Set an Expiration Date on Shared Google Drive Files

May 18, 2016

Ya'll Ready for This? Chart Integration for Docs and Slides!

I have been waiting for this for quite some time.  People have asked if it is possible, and I always had to say no.  But not any more.  What is it you might ask?  Didn't you read the title?  It's chart integration for Docs and Slides! 

If you have a chart or graph in Google Sheets, you can easily integrate it into a Google Slides presentation or a Google Doc!  Just go to the Insert Menu and choose Chart > From Sheets.


Need to insert a chart from a Google Sheet into Google Slides?  Its just as easy...


Not only that, but once your chart is in your Doc or Slides presentation, you can jump directly to the Sheet your chart originated from and update it with one click.  Also, you can change your data to update the chart, and reflect changes to your presentation or doc with one click.


I so could have used this just about a month ago when, across our district, 5 different school sites were inputting data regarding a vote on textbook publishers for adoption year into several linked Google Sheets.  All the data was gathered and shown in a graph on Sheets.  We wanted to have a graph that reflected the change in votes as the data came in, but that also showed up in a Slides presentation.  So glad to see this update.

So for all the science teachers out there, you can create a slide presentation with an active Google Sheets graph, linked to data from a student spreadsheet.  As data is collected or input by students, you can update your findings on the screen in real time.  This is great for lab day!


May 4, 2016

Havin' Fun with Conditional Formatting: Google Sheets & Punnett Squares

Sometimes in Science classes, the best way to get the point across to a student is by using an interactive activity.  There are many out there that exist, but how would you like to have your own that you create and that you can modify as needed?  

As a Biology teacher, I was always searching for interactive content to teach Punnett Squares and Mendelian Genetics.  In doing so this week for our Science Teachers, I put together an activity that yielded this video.  It utilizes Conditional Formatting in Google Sheets to add a bit of interactivity to help students understand the connection between Genotype and Phenotype.  


For the non-Science teacher, hopefully this video gives you some insight into how Conditional Formatting can be used in different ways.

For the Science teachers out there, if you'd like a copy of the activity, use this link.  

Apr 5, 2016

The Techy Coach Chrome Extension

Techy Coach Video Tutorials are now available to users as a Chrome Extension.  Now you can access tutorials through a popup window, allowing you to work while you learn.  


Topics available through the extension include:

  • Google Drive
  • Google Docs
  • Google Sheets
  • Google Forms
  • Google Slides
  • Google Drawings
  • Google Classroom
  • Gmail
  • Google Calendar

Just go to the Chrome Web Store and search for Techy Coach.  You can also use this direct link.

Apr 3, 2016

How to Protect Information in a Google Sheet

Sometimes in Google Sheets, it is necessary to protect a range of cells, or even an entire sheet so that other users cannot edit them.  Likewise, you may have multiple users in the same sheet, and you may have the need to set permissions for cells that allow only certain users to edit.  An example may be a Sheet you are using for Collaboration, in which you want each student to have access to only one row.  Another example is when a Sheet is being used as a fillable form rather than using a Google Form, and you wish to protect headers, questions, and other data from end users, while still allowing them to enter information in empty cells.

To protect cells in a sheet:


  1. Highlight the Range of cells you wish protect
  2. Click on the Data Menu
  3. Select Protected Sheets and Ranges
  4. A menu will appear at the right of your sheet.
  5. Click Set Permissions
  6. Change "Only You" to Custom and enter the account of the user you'd like to restrict to these cells.


To protect an entire sheet:
  1. Click on the dropdown menu in the Tab of the Sheet you want to protect.
  2. Choose Protect Sheet
  3. A menu will appear at the right of your sheet.
  4. Click Set Permissions
  5. Change "Only You" to Custom and enter the account of the user you'd like to restrict to this sheet.

Both of these functions come in very handy.  There have been several times when I have used a Google Sheet as a group activity in which I wanted students to answer questions that we could all view and discuss as they were being answered.  But because some students like to "mess" with other's cells, it was necessary to protect that information and allow only the user of that row or cell access.  

Hope this helps!

Mar 29, 2016

Workflow AddOns for Google Docs and Sheets

Earlier this week, a subscriber posted a question for the Techy Coach regarding Workflows and Document Approval.  Specifically, there was a need for an AddOn that would allow users to get approval from multiple document reviewers.

To answer this question, I posted this tutorial regarding two AddOns:  Workflows and Collavate.  Both of these AddOns are available for Docs and Sheets and work great for document review/approval.  Take at look at the tutorial and then use the links below to find these AddOns.


Add-onCollavate - https://goo.gl/yEvUlv

Mar 25, 2016

Create Pixel Art with Google Sheets

Several articles  over the last few years have been posted on the web about creating Pixel Art on Google Sheets.  To give everyone out there a visual explanation, I've created this tutorial on how to create your own Template.  Enjoy and feel free to download the template below the tutorial to try your hand at pixel art.


Mar 3, 2016

Google Apps Updates - Google Sheets and Templates for Docs

This week, Google dropped two updates that are sure to whet your appetite.  Take a look at these changes!

Google Sheets

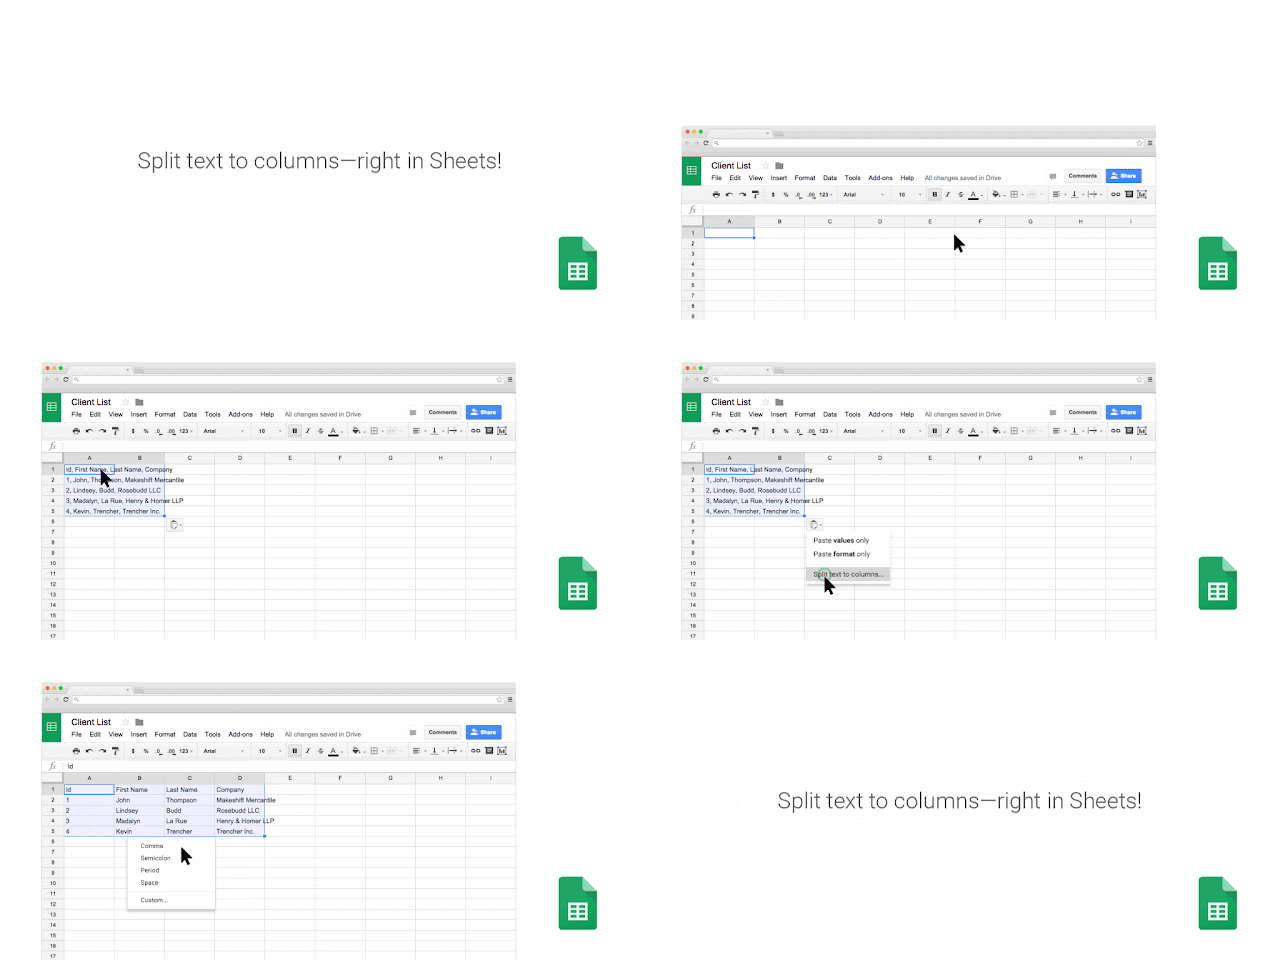
For all of you spreadsheet lovers who have been waiting for a text-to-column tool, its here!  On March 1st, Google added a Text-To-Column option allowing you to split text into separate columns.  Here is a sample along with the post from Google


Templates for Google Docs

Also, today, Google released new templates available for Docs, Sheets, and Slides users.  These templates have been created by pros like Quickbooks, Google Science Fair, and Reading Rainbow.  To use Templates, all you have to do is click on the File menu of any doc, choose New and Template.


You can also access the templates by visiting the main links for each doc: