Google released a new feature today that allows users to insert videos hosted and stored in Google Drive, directly into a Google Slide. So if you create a video for use in a presentation, you can save it in Google Drive, and easily add it to your presentation in just a few short steps. You can also choose how much of the video clip is shown in the presentation, and choose from other settings as well. Also if you are in a school district that normally blocks the use of YouTube on campus, your students can utilize the option of downloading a video from YouTube, and saving it in Google Drive. Then follow the simple steps shown in the video below to insert the video from Google Drive. Just make sure that if you are using videos from YouTube, or are downloading them that you cite your source by copying and sharing the URL in your Google Slide show.
Last Fall, Google announced the Early Adoption Program for Google Team Drives. This feature - available in Google Drive - allows teams to create and use a Team Drive, which is a collaborative space to create and share files.
Who can use Team Drives?
Now available for GSuite for Business and Education, anyone in your domain - individuals and Google Groups included - can be added to a Team Drive. Likewise, anyone in your domain can create a team drive.
Benefits
By creating a Team Drive, any files that are in the drive can be viewed or edited - depending on managed access - by anyone in the team. If any member of the team leaves, no files are lost, as the files belong to the team - not an individual.
Access
There are 4 tiers of access for members of a Team Drive:
Full Access - can manage members and Upload/Delete/Edit all Files
Edit Access - can edit all files and upload new files
Comment Access - can view and comment on all files
View Access - can view all files
This allows you to set users with different levels of access, to prevent accidental deletion of files, and to prevent users from uploading content without permission. As a general rule it will be good to set at least 2-3 other users you trust to Full Access. This will allow management of the Team Drive to continue if one person leaves the organization.
Files
Currently, the only files you can create within a Team Drive are Docs, Sheets, Slides, Forms, and Drawings. If a file is deleted, it will reside in the Team Trash for 30 days, upon which time it will be deleted forever.
Video Tutorial
Watch this video for more information or read more regarding the release of this feature at the GSuite Update Blog.
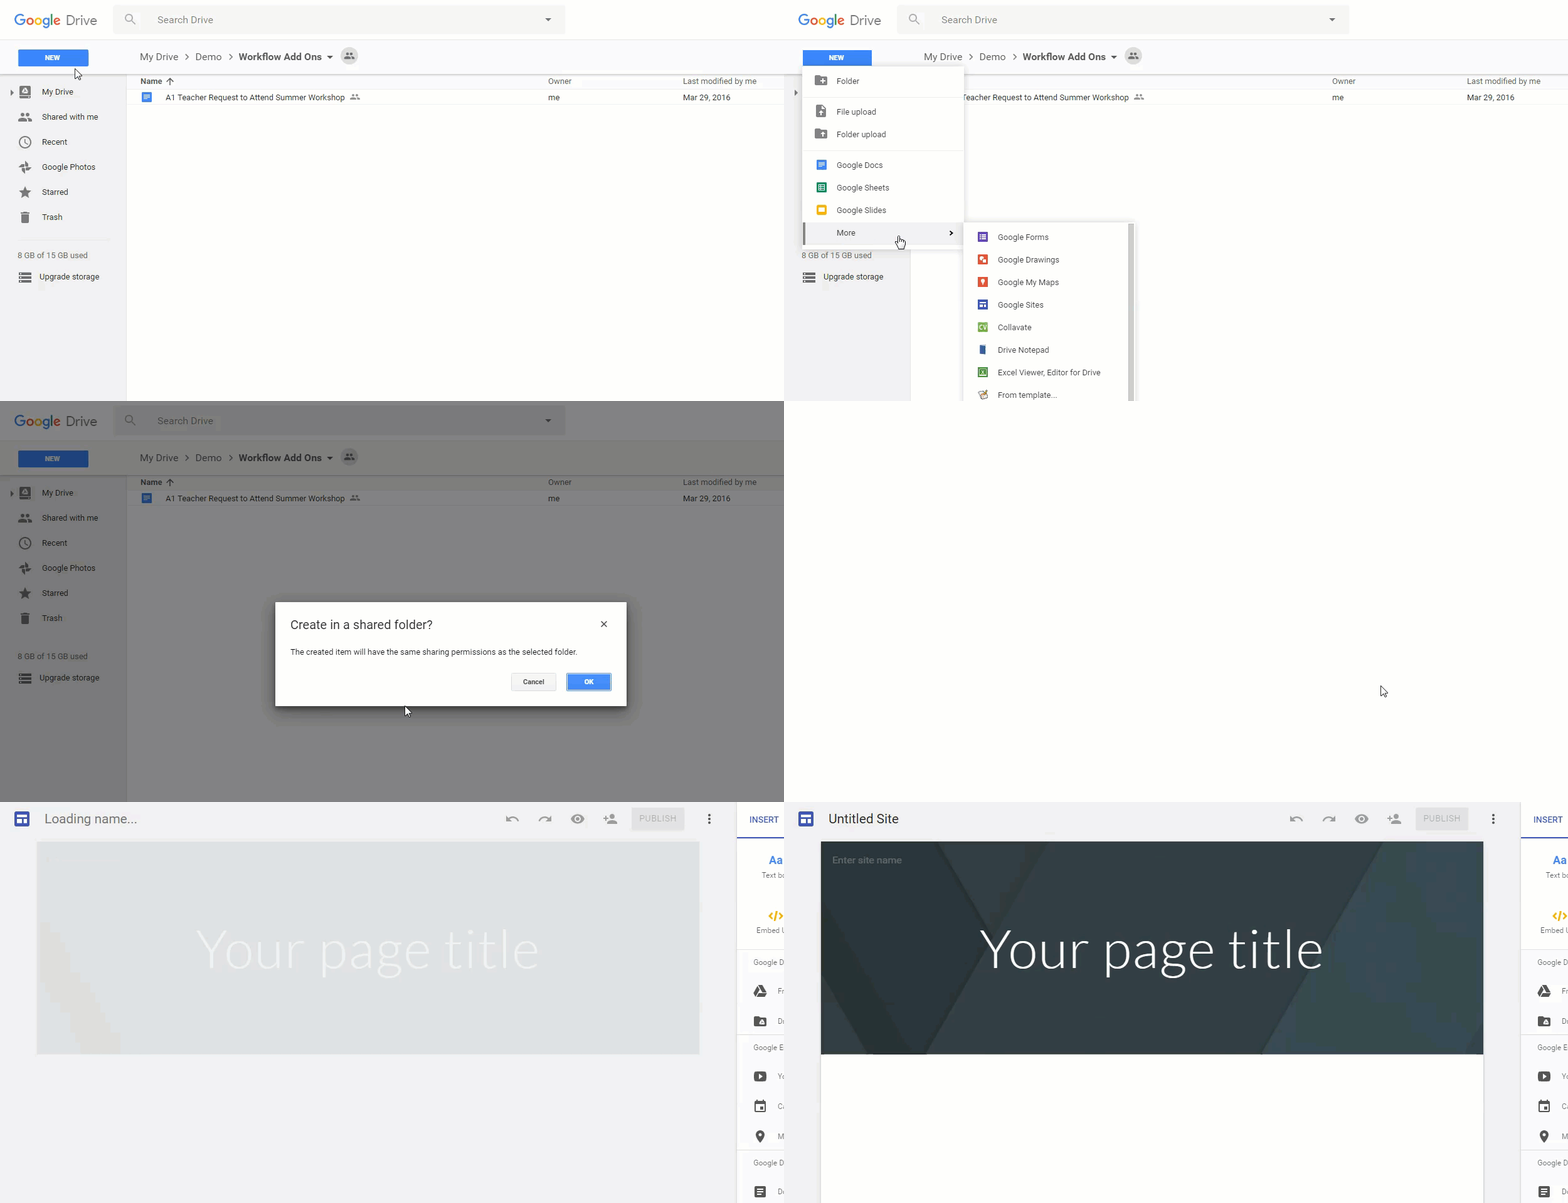
If you are a regular Gmail user (not affiliated with GSuite for Education or Work), you now have access to the New Google Sites. The New Google Sites is available through Google Drive. To use Google Sites:
Have you been anxiously waiting for the New Google Sites to come to your school? Well the wait is over. Starting tomorrow, November 9th , the New Google Sites will be available to users on the Rapid Release track (Scheduled Release Track launches on Nov 21).
For those who have been waiting for this release, here are a few tips regarding this release... Google Admin Users, scroll to the bottom of this article for important info.
Teacher Users
New Google Sites will be available through Google Drive. Just go to http://drive.google.com and click New > More > Google Sites to create your site. New Google Sites will also still be available at http://sites.google.com. You will have to click New Google Sites in the left margin. If you want to learn more about this release and how the New Google Sites looks and feels, watch this tutorial video.
Adding Content
Its easy to add content to your New Site. Just double click anywhere on your page, and a page editor wheel will appear allowing you to insert Images, Links, Text, Drive Files, or uploaded documents.
Google Apps Integration
You still have the ability to integrate and add content from a wide variety of Google Apps and Tools. Add content such as:
Embed
YouTube
Google Calendar
Google Maps
Insert
Google Drive Folders
Google Docs
Google Slides
Google Sheets
Google Forms
Charts from Sheets
Responsive Design & Themes
Page and Subpage Navigation - Nest pages under each other for Subpage navigation - just drag and drop.
Easily add Theme Presets. Just click the Themes menu and choose from 6 design themes.
Image Resizing - As you add images to your page, you can resize them. Sites will automatically crop them for optimal viewing, but you can always uncrop as needed.
Drag, Drop and Resize Content - All sections, images, and inserted items can easily be edited just by dragging and dropping, or using the resize tools.
Watch for additional features to be released over the next year....
Google Admin Users
If you are the Google Admin for your district, and you wish for your users to have access to the New Google Sites, it is important that you do the following:
Classic Sites and Google Drive must be enabled for your organization. You can find instructions to turn it on here.
New Sites will follow Google Drive sharing settings in the Admin Console. It will not follow the sharing settings for Classic Sites.
To edit Sharing Settings for New Sites go to Apps > GSuite > Drive.
To edit Sharing Settings for Classic Sites, go to Apps > GSuite > Sites
The New Google Sites has a release date for GSuite Schools! According to news in my inbox today, Google will release the New Google Sites on November 9th. This release of Sites offers some visual advantages over the old sites, as well as new features and will continue to add some of the older settings and tools you are used to. If you'd like to take a look at the New Google Sites, watch here:
As your school district prepares for this release, there are a couple of things to keep in mind:
The Rapid Release is November 9th. Domains set to a Scheduled Release track will see Sites 2 weeks later.
Districts will need to make sure that Google Sites and Google Drive are enabled on the domain in order for users to take advantage of this tool.
Sites will still appear at http://sites.google.com, but will also appear as a tool in Google Drive. Go to New>More>Google Sites
Classic Sites will still be available for a while in tandem.
Look for a method for converting Classic Sites to the New Google Sites in the future.
Recently in working with a Local Education Co-Op, we ran across an issue that may be important to several of you out there. While I am a big proponent of using Google Apps (Docs, Sheets, Slides) for classroom solutions, there are often times when due to Macros and other features, you simply must use a Microsoft file such as Excel. In this case, an Excel Spreadsheet was being shared between several users across Google Drive. Users were using Google Drive Sync on Macs and PCs to share and back up their files. One issue they ran across is that several temporary files would popup as a result of opening, editing, and using the Excel sheet in the cloud. As well, they found that sometimes, people would lose access to the file, as some users would click File > Save As on Excel, rather than just clicking Save. As a result, they often found that even though the filename may be the same, users lost access because Save As would overwrite and replace the file. This is because Google Drive can have several files of the same name, but what makes them different from one another is the URL and the Unique Identifier in the URL Address. So if you are a Google Drive user, but you have a need to share and use a Microsoft file, here are a few tips:
Open your cloud files from Windows Explorer (File Manager) or Mac Finder - By opening your files from here, you run less risk of creating Temporary files in the cloud, that may create a bundled mess in your cloud folders.
Use the Microsoft Office Plugin for Google Drive- This plugin creates a line in your File>Open menu in Office allowing you to access your Office files in Google Drive.
Are you new to Google Apps for Education? If you are, grasping some of the more intricate tips and tools can be a lot to take in all at once. You need training on your time from someone who knows Google Apps! That's why the Techy Coach blog offers specialized online courses on Google Apps! Try one of these courses to get you started:
Still shackled to the big box suite of software on your PC? Want to learn the first steps to creating a paperless classroom? Unplug and go mobile with Google Drive. This course will help you become more productive while learning how to:
Heard of Google Forms, but you're just not sure what it can do for you? This course will walk you through how Google Forms works, from start to finish.
Learn the basics of what Google Forms can do.
Uncover advanced features you didn't know about.
Discover ways to use forms that stretch beyond basic polling.
You'll be making polls, surveys, assessments, and learning activities in no time!
This week, I will be sharing Google Apps tips with some of the elementary school teachers in our district. I thought I would also share it here in the event that it benefits someone else. Look for tips on Google Calendar, Drive, Docs, Sheets, Slides & Forms. Slides include links to Video Tutorials and Sample Material.
As many districts are rapidly approaching the start of school, it is a great time to reflect on EdTech, projects, and general tech tips. So, with that in mind, I'm passing along a list of articles to help educators start the new year!
The next timesaver tip I have to share with you involves Google Sites (both old and new) and a Class Photo Gallery.
If you've ever set up a Google Slide show as a photo gallery and then embedded the presentation on a Google Site, you know how awesome it can be to add more photos later, and make it easy for people to view class pictures on your website.
Let's take that one step further and use a feature that is found inside Google Sites: Insert>Google Drive>Folder. Watch this video to see what I mean!
When sharing files with other on Google Drive, you may find that in certain situations, you need to limit how others access your files and folders, and for how long. For instance, you may want to:
Share files for a limited amount of time.
Prevent users from Sharing your files with others.
Prevent users from downloading, copying or printing your files.
Luckily, Google has security features that allow you to do just that. To change these features:
Click the Share button in any Doc, Sheet, or Slide.
Click on Advanced at the bottom right of the popup.
Each of these features is outlined in the videos below. At this time, these features are only available to Google Apps for Education and Google For Work users.
Happy Secure Sharing!
How to Limit Access Features for Shared Google Files
How to Set an Expiration Date on Shared Google Drive Files
Today, Google Slides released an update that allows presenters to accept questions from the audience during a slide show. This is such a huge bonus in terms of helping students feel comfortable asking questions. If you have students that are a bit shy about raising their hand in class, they can still participate. This update will appear right away for Rapid Release users, and very soon for Scheduled Release GAFE users. To see a preview of how it works, view this video from Google. To use Presenter View:
Open your Google Slides presentation
Click the Dropdown menu next to the Present Button
Choose Presenter View
Choose Audience Tools and Click Start New
Share your link to your audience. (Comments in Sharing settings must be enabled to allow users to ask questions)
There is also a Laser Pointer option available when you are in presentation mode. Once you present your slideshow, you can select Laser Pointer from the floating toolbar and your mouse becomes a Laser Pointer! Very cool!
So you've got graduating seniors who have been using a District-owned GAFE (Google Apps for Education) Account. Many of them have already made plans to get out of high school long before now and their heads are in the clouds about graduation! But eventually, as freshmen at college, they will look back and think... "Hey! I need to look up that essay I wrote in Senior English!" or "I need a sample of work from my high school portfolio!" The trouble is, if they have not already downloaded it, they may not be able to access it because many districts will archive or retire GAFE accounts for Graduating Seniors.
Now, there are some that would tell you to open a new Gmail account, and just share your docs from drive with the new account. The trouble with this is:
Once the old account is archived, links to "Shared" documents will disappear.
You cannot transfer ownership of shared files to an account outside of your GAFE district.
So what do you do? There's a solution for that. Google Takeout! This is a service from Google that allows you to download a ZIP file of your docs from Google Drive so you can manually upload them to a new account. Watch this video to learn how....
A couple of tips to keep in mind:
Focus primarily on your Drive Account.
While there are other services you can add to your zip file, your docs are the main thing you'll want to save.
Set your NEW Drive account to Convert Uploaded Documents to Docs format
When you download your ZIP File, all downloads are converted to Microsoft Office Files. You'll want to convert them back.
If you decide to download messages from Gmail, try using this link to learn how to put them into your new account: http://goo.gl/yK8p8t
There are no excuses when it comes to enjoying the freedom to access your Google Drive files from anywhere. And that is simply because Google has made Drive accessible from almost everywhere.
According to a release on the Google Blog on Wednesday, April 13th, Google Drive is now accessible in Yahoo Mail and WhatsApp. So you can send emails and attach documents from Drive while working in either app. This new feature means that you can share documents and grant shared access to them just as you would in Gmail or Google Drive. Read the Google Blog post for more links and info....
Techy Coach Video Tutorials are now available to users as a Chrome Extension. Now you can access tutorials through a popup window, allowing you to work while you learn.
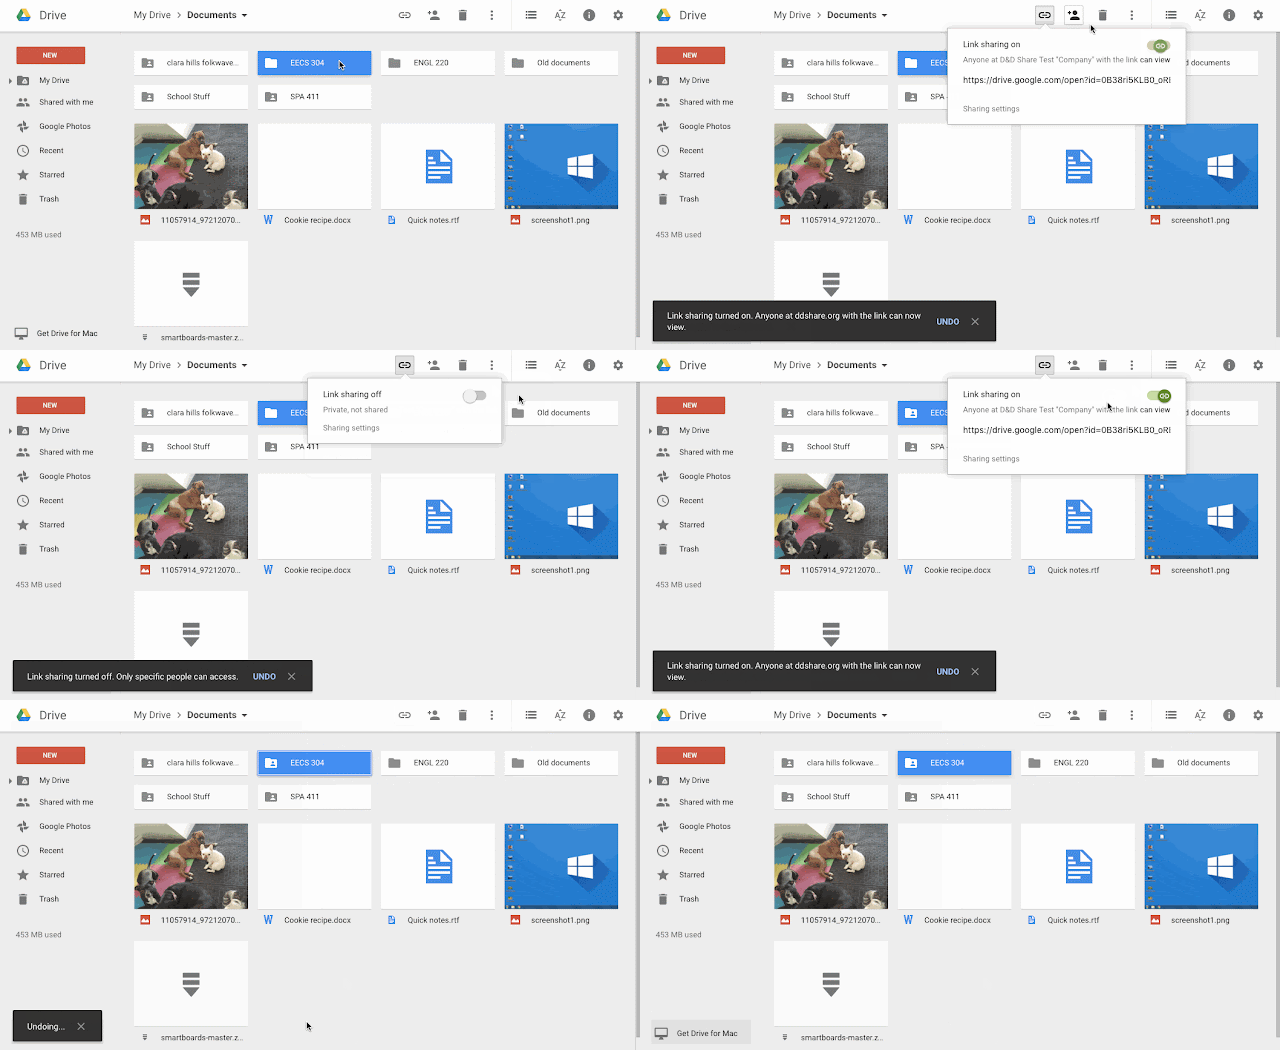
Sometimes as a tech-geek, I feel that technology providers change tools to the point that I feel spoiled. But if there is a quicker way to do things, the lazy man inside me wants to find it. Here's one for you. This week, Google released an update to Drive allowing faster link sharing. Now, simply by selecting your folder or file, you can click the Link icon at the top of Drive, and get a link without the need to open the document and then open sharing settings. The popup box allows you to turn on link sharing to "Can View" and copy the link so you can share documents quickly. Conversely, you can also quickly turn Link Sharing off if it is already on and you need to make that change.
Recently a question was posted in the "Ask the Techy Coach" page regarding Google Sites and Google Classroom. A teacher had inquired about creating a project for students in which they would create an eBook on a Google Sites page. Students would "pick up" study guides from Google Classroom and would insert them into their Google Site. Her concern is over how well the two integrate with one another. Just last year, I posted an article called Google Sites vs. Google Classroom. While that article gives a basic Pros & Cons approach to each, this article will discuss how the two can be integrated. While Google Classroom is not directly integrated with Google Sites on the same level as, say, Google Docs or Slides, you can still use Sites as the platform for a project, and Classroom as a place to submit work. For the project side, students can use page templates in Google Sites to:
Blog about a Topic (Announcements)
Add Content such as YouTube videos (Web Page)
Create a database of information (Lists)
Store files (File Cabinet)
If you are interested in learning more about how Google Sites work, and how to get started, watch here:
Sites can also be used as a Digital Portfolio. A Google Site can be set up as a Template which could then be used as a starting point that all students could use and develop in their own style. While monitoring this may seem like a nightmare, there is a great solution in an AddOn called Site Maestro. This handy tool allows teachers to set up an entire class with their own Google Site, while using a Google Sheet as a dashboard for monitoring their progress. Use my Google Sites tutorial to help you create a skeleton site that your students can use, and then use this tutorial from New Visions Cloudlab to help you get started with your own ePortfolio project for students:
Don't forget, there are many other great web tools you can use to get students started with Blogging or ePortfolios, such as:
Now what does any of this have to do with Google Classroom? If you are like me, you probably have grown to love the simplistic design of Google Classroom, and the way it integrates with Google Drive. But while it may not work as well with Sites, you can still use Classroom to:
Post links and docs for items required in a Project
While most of the work will be done inside the Blog, students can still pick up items like Docs or Slideshow templates that they can post within their Site. For instance, the teacher could post a Doc in Google Classroom with instructions on how students will use the templates, where they should appear, or how they fit in the portfolio, as well as due dates. In this instance, I have to point out that the integration between Google Sites and Google Docs is great. Google has made it easy to embed or insert almost anything from Drive into a Site.
Post assignment submissions for sections of a Google Site
Once students have completed work in their Google Site, they can use the Assignment Submission page to paste a URL link to their finished product.
Post Reminders & Project Due Dates
It never hurts to post timely reminders regarding projects in Google Classroom - especially since they will be sent by email to students as well.
Use the Question tool in Classroom so students can post links to their Google Site for discussion
The Question tool allows teachers to create a Forum in which you can post a question, and have students respond, and comment on each others responses. This could be used as a great way to get students in a dialogue about their work. This is a great way to introduce peer grading or suggesting.
All this being said, this answer was mostly for any teacher that uses Google Classroom on a daily basis and may be looking for a solution to guide and oversee a project such as an online project. But don't ever feel that you have to use a certain tool because it is new. If another tool will do the job, use it. The tool should never become more important than the process or learning experience.
Currently, I am in the process of updating my webpage. As I go through that process, I'll be highlighting video tutorial pages that cover different Google Tools. Today, we'll focus on Google Maps. If you haven't used Google Maps in a while, you might be surprised by all the things you can do with Maps. Check out these tutorial videos and sample maps from the Google Maps page. With Google Maps you can:
Create your own plot points
Integrate Data from a Google Sheet
Create Exploratory Activities
Insert Images and Video
Maps and Sheets
You can easily integrate data from a Google Sheet into a Google Map. View the sample maps I made below or watch one of the tutorials. MyMaps can be used in Geography, Literature or History to show locations and events in a story or lesson.
If you are a new Google Drive user, you may need the help of a handy cheat sheet. Try this one on for size. If you need extra help, you can also find some useful tutorials on my webpage. Happy Googling! Click the image below to download...