Google just dropped some great news today! Google Classroom is now available for all users - GSuite for Education AND Personal Gmail Users.
So it doesn't matter if you are a public school, charter school, or home school - or even if you just want to use it for Professional Development - you can use Classroom no matter who you are. Users will have the ability to join classes, and create their own classes. GSuite for Education Admins will have the ability to exercise greater control over Classroom as a result of this update. If you are not a part of GSuite for Education, Google encourages you to join. You can find more information about GSuite for Education here. In the meantime, if you are a personal Gmail user and you want to learn more about this powerful tool, watch these videos from my Google Classroom Playlist on YouTube!
Google released a new feature today that allows users to insert videos hosted and stored in Google Drive, directly into a Google Slide. So if you create a video for use in a presentation, you can save it in Google Drive, and easily add it to your presentation in just a few short steps. You can also choose how much of the video clip is shown in the presentation, and choose from other settings as well. Also if you are in a school district that normally blocks the use of YouTube on campus, your students can utilize the option of downloading a video from YouTube, and saving it in Google Drive. Then follow the simple steps shown in the video below to insert the video from Google Drive. Just make sure that if you are using videos from YouTube, or are downloading them that you cite your source by copying and sharing the URL in your Google Slide show.
How often have you really asked yourself this question? It is all too easy to stand at the front of the room on a daily basis, with the goal of teaching a lesson - often as you have always done it for years - and never think about or wonder whether students are bored with your class. Yes, we see kids who are disconnected, but we often attribute this to apathy or laziness.
This discussion of whether students are bored came up in a workshop we had this week on Classroom Management. In a recent survey, it was found that 69% of our students reported being bored with their classes. When we began to discuss this surprising statistic, we discussed ways that we could avoid this situation.
One thing I mentioned from my own experience, is that it always comes down to student engagement. If you aren't keeping students engaged in the curriculum, it is all too easy to send them into fits of boredom. So as a result of this discussion, I was prompted to write this article, with the suggestion I gave at the workshop.
To avoid Student Boredom....
For years I would come to work with the same plan in mind - Lecture, seatwork, lab, test. But this simply does not work with the 21st Century learners we face today. I had to change the way I taught. So here is how I remedied the situation. Every day that I worked with my students, I would break up the time so that they never had the chance to get bored. I created lessons that would engage them at every point, and change things up every 10-15 minutes. Each time I approached a new unit, I kept the 3 E's in mind - Explore, Explain, & Engage.
Explore
For this part of the lesson, I would find some kind of activity, such as a video, that covered the topic of the day.
Look for a video that introduces your topic, or at least explains it in a way that is subtly different from your style. You can then expand on the topic later.
Make sure your video is short and to the point. Try to find videos are are 5 minutes or less if possible. But don't go beyond 15 minutes, as you'll lose them.
Use YouTube to get started. There are many subject specific channels out there that can help. A quick search of YouTube in your specific subject will yield some good results.
If you are looking for a broad category such as Science or English, filter your search to find a Channel in your Subject Area.
When finished watching the video, take your students into a discussion that isn't necessarily focused on the content. focus on questions like, "What did you like most about the video?""List a few things that you learned from the video" or "What do you already know about this topic that the video covered?"
Explain
The next step in the process is to take a moment to explain the topic as you normally would in a lecture. The key component to this part is to refrain from making this a "Sage on the stage" lecture. Take about 15 minutes to expand on what was covered by the video. Allow students to ask questions along the way. You can do this by allowing students to use their phones with one of the following services or options:
Google Slides Presenter View - create your lecture using Google Slides, and then use Presenter View to allow them to ask questions along the way.
Use Today's Meet - You can create a Backchannel page that students can navigate to on their phone. Students can ask questions using Today's meet. They can then reference the site later if they want to see the backchannel of questions.
Engage
Once you have completed this section of the lesson, its time to move on to something Hands On! Find an activity - a science lab, an interactive activity using Google Apps, or a Discussion Forum online - that ties to your subject, but allows students to reflect, respond, and learn by doing. If you find it difficult to gather materials for an activity, go digital and use interactives such as:
There are tons of activities available on the web, and a simple Google search will help you get started. These are just a few to give you an idea of how and where to start.
In using this method of covering material with my students, I've found that it also serves students with different learning styles. If I have students who are Auditory or Read/Write, they are served best by the Explore or Explain phase. Visual Learners also benefit from these stages. The Kinesthetic learners really start to pull it altogether in the Engage phase.
Hopefully this helps you in addressing student engagement and general high school boredom. If you have tips of your own, please feel free to add to the Comments section.
This weekend, Google hosted the Education On Air: It Takes A Teacher online conference. This conference included a host of global online workshop opportunities, as well as discussion forums and product updates. If you missed it, you can still access the workshops and keynotes on demand at this link. As part of this weekend online conference, Google announced some important updates that will positively impact the way schools communicate and share files.
Chromebook Login
The first feature focuses on Chromebook login. Logging in to a Chromebook can be a simple task for a middle school or high school student, and is something that we take for granted on a daily basis. But when I look to our resource teachers who work with K-2 students, I know that logging in to Chromebooks can be a task that takes a while - especially when they need to remember an email address and password. Now there are two ways younger students can login easily!
Clever Badges
With Clever Badges, students can use a specialized badge, with a code that they can hold up in front of the webcam. The Chromebook webcam will recognize the code and log the student in using their GSuite credentials.
CloudWise
Another login solution comes in the form of CloudWise. This login solution allows students to login using a series of pictures they have pre-selected.
Parent / Guardian Access to Classroom
Earlier this school year, a major advancement was added to Google Classroom, allowing parents and guardians with a Gmail, the ability to sign up and receive email updates on Google Classroom. With this weekend's product announcement, you no longer need a Gmail account to gain access to your student's classroom updates! Any email can be used to sign a Parent or Guardian up for classroom.
Google Drive & Gmail Migration
While this ability was available using Google Takeout, Google has promised that early next year, the migration of Drive data and Gmail to another Google Account will become much easier. This is a big deal for graduating students who would like to take their portfolio of work with them after they leave public school. Plus, Google Admins will have the ability to ease this transition through settings on the Google Admin Dashboard. For more information, stay tuned to updates in early 2017.
Citation Tool
Finally, the one thing that many users have been waiting to see the return of is the citation tool. With the addition of the Explore tool to Docs, Sheets, and Slides, the citation tool - ability to search and cite sources, quotes, etc... in MLA/APA/Chicago - was removed. Users, through a concerted online polling effort, requested that the citation feature return. Google has listened and now, with the simple click of a quotation mark found on search results, you can cite a source in your document. See the Gsuite Update Blog for details.
Think that Google Classroom is just a place to post your Syllabus? Think Again! Are you interested in sharpening your skills with Google Classroom? Just getting started and need some guidance?
Last Fall, Google announced the Early Adoption Program for Google Team Drives. This feature - available in Google Drive - allows teams to create and use a Team Drive, which is a collaborative space to create and share files.
Who can use Team Drives?
Now available for GSuite for Business and Education, anyone in your domain - individuals and Google Groups included - can be added to a Team Drive. Likewise, anyone in your domain can create a team drive.
Benefits
By creating a Team Drive, any files that are in the drive can be viewed or edited - depending on managed access - by anyone in the team. If any member of the team leaves, no files are lost, as the files belong to the team - not an individual.
Access
There are 4 tiers of access for members of a Team Drive:
Full Access - can manage members and Upload/Delete/Edit all Files
Edit Access - can edit all files and upload new files
Comment Access - can view and comment on all files
View Access - can view all files
This allows you to set users with different levels of access, to prevent accidental deletion of files, and to prevent users from uploading content without permission. As a general rule it will be good to set at least 2-3 other users you trust to Full Access. This will allow management of the Team Drive to continue if one person leaves the organization.
Files
Currently, the only files you can create within a Team Drive are Docs, Sheets, Slides, Forms, and Drawings. If a file is deleted, it will reside in the Team Trash for 30 days, upon which time it will be deleted forever.
Video Tutorial
Watch this video for more information or read more regarding the release of this feature at the GSuite Update Blog.
As I have been developing online PD courses for my district, I have been working toward updating my catalog of videos for Google Classroom. In this video, I discuss the use of the Create Question option. As far as classroom assignments go in an online environment, one thing that I had been waiting for was an effective method for conducting an online discussion forum or journal-type assignment in Google Classroom. Prior to the addition of Create Question, I used to generate discussion assignments using a Google Sheet or Hyperdoc. To use the Create Question option in classroom, just click on the + sign and choose Create Question. You have the option of choosing between Short Answer and Multiple Choice, which is what I use for Poll Questions, Bellringer Activities, and Exit Tickets. Watch this video for more information. Enjoy!
In the first part of this series, I explained how the use of digital badges in District Online Professional Development has taken off. In this article, I explain how I set up our Badge Leader-board. In our district, I have had a great response to professional development, and I wouldn't necessarily guess it is because of the badges themselves - although many people like to have that tangible (digital) item to show they have completed something. No, I believe what has created such a surge in online PD is the leader-board! Some people in general are naturally competitive - they see that others are involved, and they want to be at the same level - or greater - in terms of training and understanding. As a result, I created our leader-board to show how many and what type of badges have been earned by each building/school site. Each week, I send a reminder of which school is in the lead. I created our leader-board using Google Sheets, and then posted (embedded) my Google Sheet on the Google Site we use for Professional Development. This allows those who have completed /earned a badge to show off their name, and allows everyone to see who is in the lead. This video explains how I set up our Google Sheet/Leader-board. Enjoy!
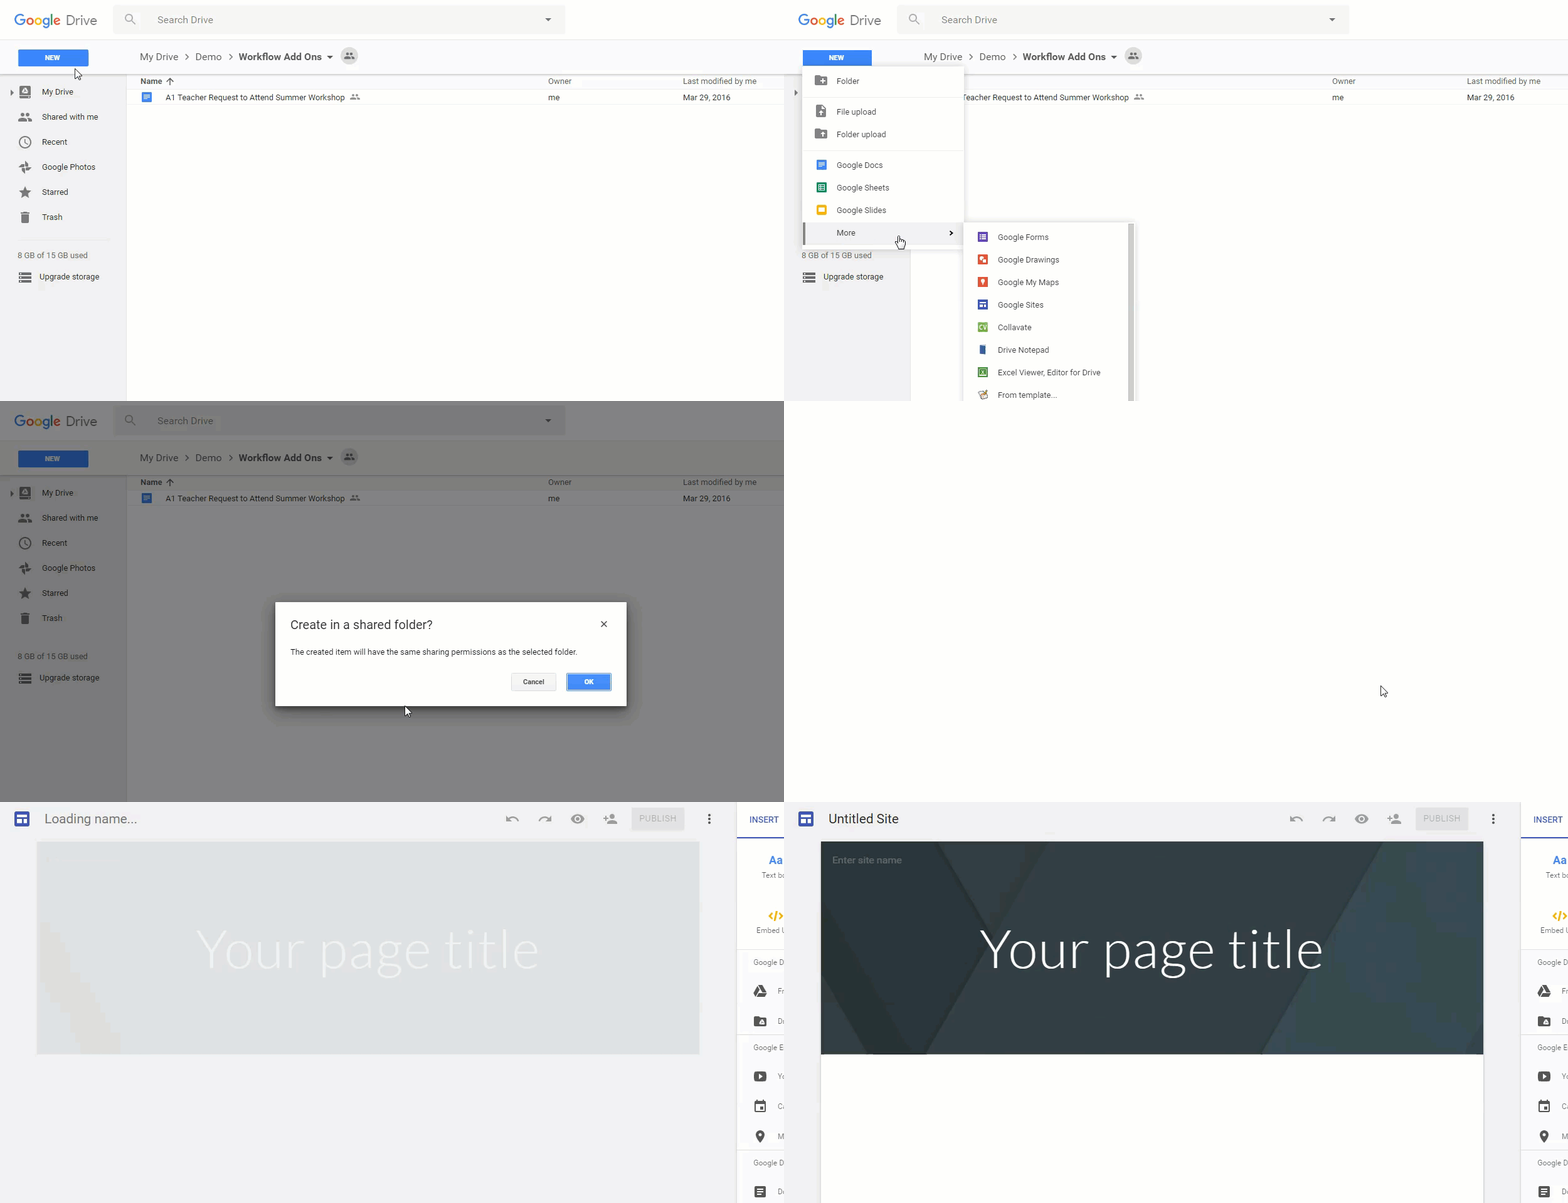
If you are a regular Gmail user (not affiliated with GSuite for Education or Work), you now have access to the New Google Sites. The New Google Sites is available through Google Drive. To use Google Sites:
Have you been anxiously waiting for the New Google Sites to come to your school? Well the wait is over. Starting tomorrow, November 9th , the New Google Sites will be available to users on the Rapid Release track (Scheduled Release Track launches on Nov 21).
For those who have been waiting for this release, here are a few tips regarding this release... Google Admin Users, scroll to the bottom of this article for important info.
Teacher Users
New Google Sites will be available through Google Drive. Just go to http://drive.google.com and click New > More > Google Sites to create your site. New Google Sites will also still be available at http://sites.google.com. You will have to click New Google Sites in the left margin. If you want to learn more about this release and how the New Google Sites looks and feels, watch this tutorial video.
Adding Content
Its easy to add content to your New Site. Just double click anywhere on your page, and a page editor wheel will appear allowing you to insert Images, Links, Text, Drive Files, or uploaded documents.
Google Apps Integration
You still have the ability to integrate and add content from a wide variety of Google Apps and Tools. Add content such as:
Embed
YouTube
Google Calendar
Google Maps
Insert
Google Drive Folders
Google Docs
Google Slides
Google Sheets
Google Forms
Charts from Sheets
Responsive Design & Themes
Page and Subpage Navigation - Nest pages under each other for Subpage navigation - just drag and drop.
Easily add Theme Presets. Just click the Themes menu and choose from 6 design themes.
Image Resizing - As you add images to your page, you can resize them. Sites will automatically crop them for optimal viewing, but you can always uncrop as needed.
Drag, Drop and Resize Content - All sections, images, and inserted items can easily be edited just by dragging and dropping, or using the resize tools.
Watch for additional features to be released over the next year....
Google Admin Users
If you are the Google Admin for your district, and you wish for your users to have access to the New Google Sites, it is important that you do the following:
Classic Sites and Google Drive must be enabled for your organization. You can find instructions to turn it on here.
New Sites will follow Google Drive sharing settings in the Admin Console. It will not follow the sharing settings for Classic Sites.
To edit Sharing Settings for New Sites go to Apps > GSuite > Drive.
To edit Sharing Settings for Classic Sites, go to Apps > GSuite > Sites
Very Recently, Google released an update to Google Forms for Business and Education users that allows you to receive file submissions with a form. With this new File Upload question option, you can receive:
Resumes and Documents
Project Submissions
Photo Uploads
Audio File submissions
PDF files
Spreadsheets
Presentations
Videos
Drawings
While Google Classroom works in terms of submitting files for an assignment, the File Upload option means that Forms users can utilize Forms for a wide range of submissions - from yearbook photo submissions, to Grant and Organizational applications. Watch this tutorial to learn more:
Recently while putting together some online classes for District Professional Development, I decided to reward teacher attendance with Digital Badges. I had thought about doing this on several occasions in the past, but had never gotten the process off the ground. While face to face attendance to PD workshops was somewhat steady, it was not exactly as high as I had wanted it to be. Knowing that availability of time is finite, and that teachers have many responsibilities after school, I thought an online course here and there might help them get the training they needed, when it was convenient for them. So I created one class on Google Classroom to start with, and created a Badge in Google Drawings as a reward for participating.
After the first teacher had earned their badge, I decided to create a Leader Board for the district, showing how many badges had been earned at each site. I posted the first badge, announcing that we had 1 school in the lead and that they were winning. I never expected what happened next! After posting this, I had 25 enrollments come through by email. That competitive spirit that resides in some of us came to a head when the "We have a winner!" email went out. Since then, we have had a great deal of activity online. Nevertheless, I thought I would share my process for setting up classes and rewarding badges. For this series, I'll start with the creation of the badges themselves. It is a simple process that I've explained in this video. I hope you like it.
Sometimes as teachers and students, it can be frustrating to sift through the long stream that exists inside Google Classroom. For instance, if you just want to go back and look at assignments you've turned in or review assignments you still need to complete, using the Stream is not as useful. That is why Google Classroom as built in features to simplify your life and keep track of what's due and when.
What's Due?
At the top left of any class on Google Classroom, you'll find a box that shows what's due and when. This will help students keep track of important assignments. Need to see everything? Just click View All and you'll be given a window that allows you to differentiate between what you still have left "To Do" and what you've already "Done".
The Calendar!
Also, if students have more than one class in Google Classroom, they can keep track of assignments by using the Calendar. To access the calendar, just click the Menu Icon, and choose Calendar. From there, they can view a single class, or all classes to see what's due and when...
Teacher Tasks
If you're a teacher, you can keep track of all of your assignments - for multiple classes - and see who is and isn't "Done" with work that has been assigned. To do this, just click on the Menu icon, and choose Work. You can even differentiate between work that you still have "To Review" and what has already been "Reviewed".
"I have posted student presentations that they have made using Google Slides, but for a parent to view these..it says they have to sign in with a Google Account. Is there any way to do this so they don't have to have a Google account to view these presentations?"
This is a very common issue and can easily be resolved. The thing to keep in mind anytime you are posting Google documents on the web is to make sure you setup sharing rights properly. Before posting any items to the web:
Click on the Share Button
From the pop up menu, click Advanced.
Under "Who has access" click Change
Select "Anyone with the link"
Under Access, select "Can View"
Click Save & Done
After you have set your document up this way, you can post it to a website using an Embed Code or link by using the Publish to the Web option in the File Menu:
click File
Choose Publish to the Web.
Click Publish
Choose from a Link or the Embed (HTML) Code.
This is an easy way to share documents on the web - Docs, Sheets, or Slides - and a great way to present information to your audience.
One key thing to remember when posting student work is that you secure permission from parents or guardians to publish student work on the web. You might check with your principal regarding permission slips or a student contract requiring parent permission to share student work. For example, a slip sent home similar to the following, would be a good way to get parent authorization:
Parents, This school year, we will be using Google Apps for Education in the classroom. Google Apps is a free suite of tools available to schools that includes Gmail, document creation, presentation tools, and other collaboration tools. As part of that process, from time to time, we may have the opportunity to post student work on the web. The school will work to make sure student work is shared in the safest way possible, but we want to make sure you are aware and that we have your permission to do so. No student grades will be posted. As part of that, please sign and date this slip granting the school permission to post examples of your students' work for your viewing.
Of course many districts already have a technology or internet use agreement in place, as well as permission slips for use of Google Tools. If you do not already, you may want to do so. Happy Sharing!
Google just released an update to Table of Contents feature in Google Docs that allows you a bit more freedom. For a great while now, I have, as I am sure others have too, wanted the ability to add page numbers to my Table of Contents in Google Docs. But previous to this week, your only option was a table with hyperlinks to formatted sections of your doc. See example below:
But with the recent update to Google Docs, you can now choose to add a Table of Contents with Hyperlinked items, or Page Numbers.
Of course the key to making the Table of Contents tool work for you is that you apply Headers to your text. Once you apply Headers to your text, the Table of Contents tool will use this formatting to create your table.
To apply a Header:
Highlight text
Click on the Header Tool
Choose your level of formatting
Header 1, Header 2, Header 3, etc...
Once you have formatted your document, now its time to insert a Table of Contents. To add a Table of Contents to your document:
From Google Docs, click Insert
Choose Table of Contents
Choose from "With Page Numbers" or "With Blue Links"
If you've been hiding under a rock lately, you may have missed some of the changes that occurred with Google over the past 2 weeks. Personally, I've been meaning to write this post for about a week, so I am a little late to the game myself. But for those of you who haven't heard, I thought I would give you some insight into some of the changes going on with Google.
GAFE is now GSuite
The suite of tools offered by Google that we used to know as Google Apps for Education and Google for Work has been renamed GSuite. This set of tools still includes Docs, Sheets, Slides, Forms and Sites, as well as others, and is still accessible through Google Drive. It just has a new name. If you are new to GSuite (Formerly GAFE), check out this link. Your District can access GSuite for free and use all these wonderful tools to go paperless. You just need to sign up. You can also find out about all the extra benefits you get from using Google For Education rather than a personal Google Account.
The Explore Tool Has Replaced the Research Tool
In a bit of a controversial move on Google's part, the Research Tool found in Docs and Slides has been replaced with the Explore tool. The Explore tool was originally introduced as a Google Sheets feature, and can still be found there as a quick way to format Sheets and add Charts and Graphs. However, according to many posts and comments on the internet, users are upset at the loss of the Citation Tool found in the Research Tool. In spite of these concerns, the addition of the Explore Tool to Slides and Docs means that you'll gain some really cool design features. Here's what you get:
Sheets
I recently posted an article about many of the Explore features in Sheets. Check it out here. Here is the short list.
Ask questions about your Data
Format Sheets with alternating colors for each row of data
Finally, I would be remiss if I didn't highlight some of the consumer additions that Google announced this week. As part of their new family of tools, Google has added:
Just yesterday, I posted a few tips about using Google Sheets. One new item about Google Sheets that just keeps getting better is the Explore Button. If you haven't noticed this little gem, that's because it is hidden at the bottom right corner of your Sheets screen.
While the Explore button has been there for a little while, it has recently gotten a few updates. Let's take a look at what the Explore button can do...
Get Answers About Your Data
One really cool features in Explore is the Answers section. At the top of any Explore pane, you will see a search box that says, "Ask a question about your data". So for instance, with the demo sheet available with the new explore button, there is a great deal of data about the World Cup. You could simply type in "Who was the winner?" and get a quick answer about that data.
Learn from the Formula
Want to know how they did that? With any question you ask you can click See Formula and see the Sheets formula used to find the data related to your question. For example, in a question about who the winner is, Sheets uses the unique filter to arrive at the answer:
=UNIQUE(FILTER(D2:D21,D2:D21<>""))
Once you find your answer, and view the formula, you can click on the formula and it will be copied to your clipboard so you can use it and apply it elsewhere. This is a great way to learn more about the use of Functions and Formulae.
Add Formatting Quickly
In my previous post (5 Tips for Google Sheets Users) I discussed some of the simple formatting you can do to your Sheet. For example, there is a quick way to add alternating colors to your sheet. Want to save a few steps? Use the Explore button.
Insert Charts In A Snap
You can also get suggestions for Data Charts and Graphs quickly. Just click on Explore, find the chart or graph you want, and click & drag it onto your Sheet. You can also click the Pencil on the Graph to quickly edit or make changes to your new Graph.